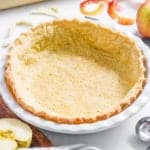
Healthy Vegan Pie Crust (Gluten-Free)
This post may contain affiliate links. As an Amazon Associate, I earn from qualifying purchases. Please read my disclosure.Creating a gluten-free and vegan pie crust that’s flaky, flavorful, and actually easy to work with felt almost impossible, until I figured out the perfect combination of simple, whole food ingredients. Now, this homemade pie crust is my go-to for every season, and has wow-ed my family and friends who can’t believe it’s both vegan and gluten free!
This crust is buttery without the butter, sturdy enough to hold fillings, and light enough to melt in your mouth. Plus, it’s surprisingly beginner-friendly once you get the hang of it!
I love knowing that I can make a delicious pie from scratch without needing any complicated gluten-free blends or processed vegan substitutes.
Whether you’re baking for the holidays, a special celebration, or just a cozy weekend treat, this crust is the perfect reliable base. It’s one of those recipes that once you master it, you’ll find yourself reaching for it again and again. I use it all the time because it’s great no matter what recipe I’m making – I’ve used it for a classic zucchini pie, a cozy vegan pumpkin pie, a savory vegan pot pie, and more!
👩🏽🍳 Why I Love This Recipe
As a health coach and mom, I’m always trying to find ways to make traditionally indulgent foods a little more nourishing, and this pie crust is a perfect example.
And after a few different trials and many errors, I figured out the perfect base ingredients. And you will be shocked at what I use! It’s made with almond flour, brown rice flour, and a secret ingredient you might not expect: cooked potato! The potato gives the dough a tender, flaky texture without needing butter or oil.
It’s also incredibly flexible. Whether I’m making a sweet pie or a savory one, this crust holds up beautifully and has just the right amount of flavor to complement any filling. And because it’s naturally gluten-free and vegan, it’s perfect for accommodating a variety of dietary needs without anyone feeling like they’re missing out.
What surprised me most is how approachable this dough is to work with. It might seem a little tricky the first time, but I promise – it comes together easily, and rolling it out between parchment paper makes transferring it to the pie dish a breeze!
🥘 Ingredients
This vegan pie crust is made with simple, wholesome ingredients that work together to create the perfect balance of structure, flakiness, and flavor. Here’s what I use and why each one matters:
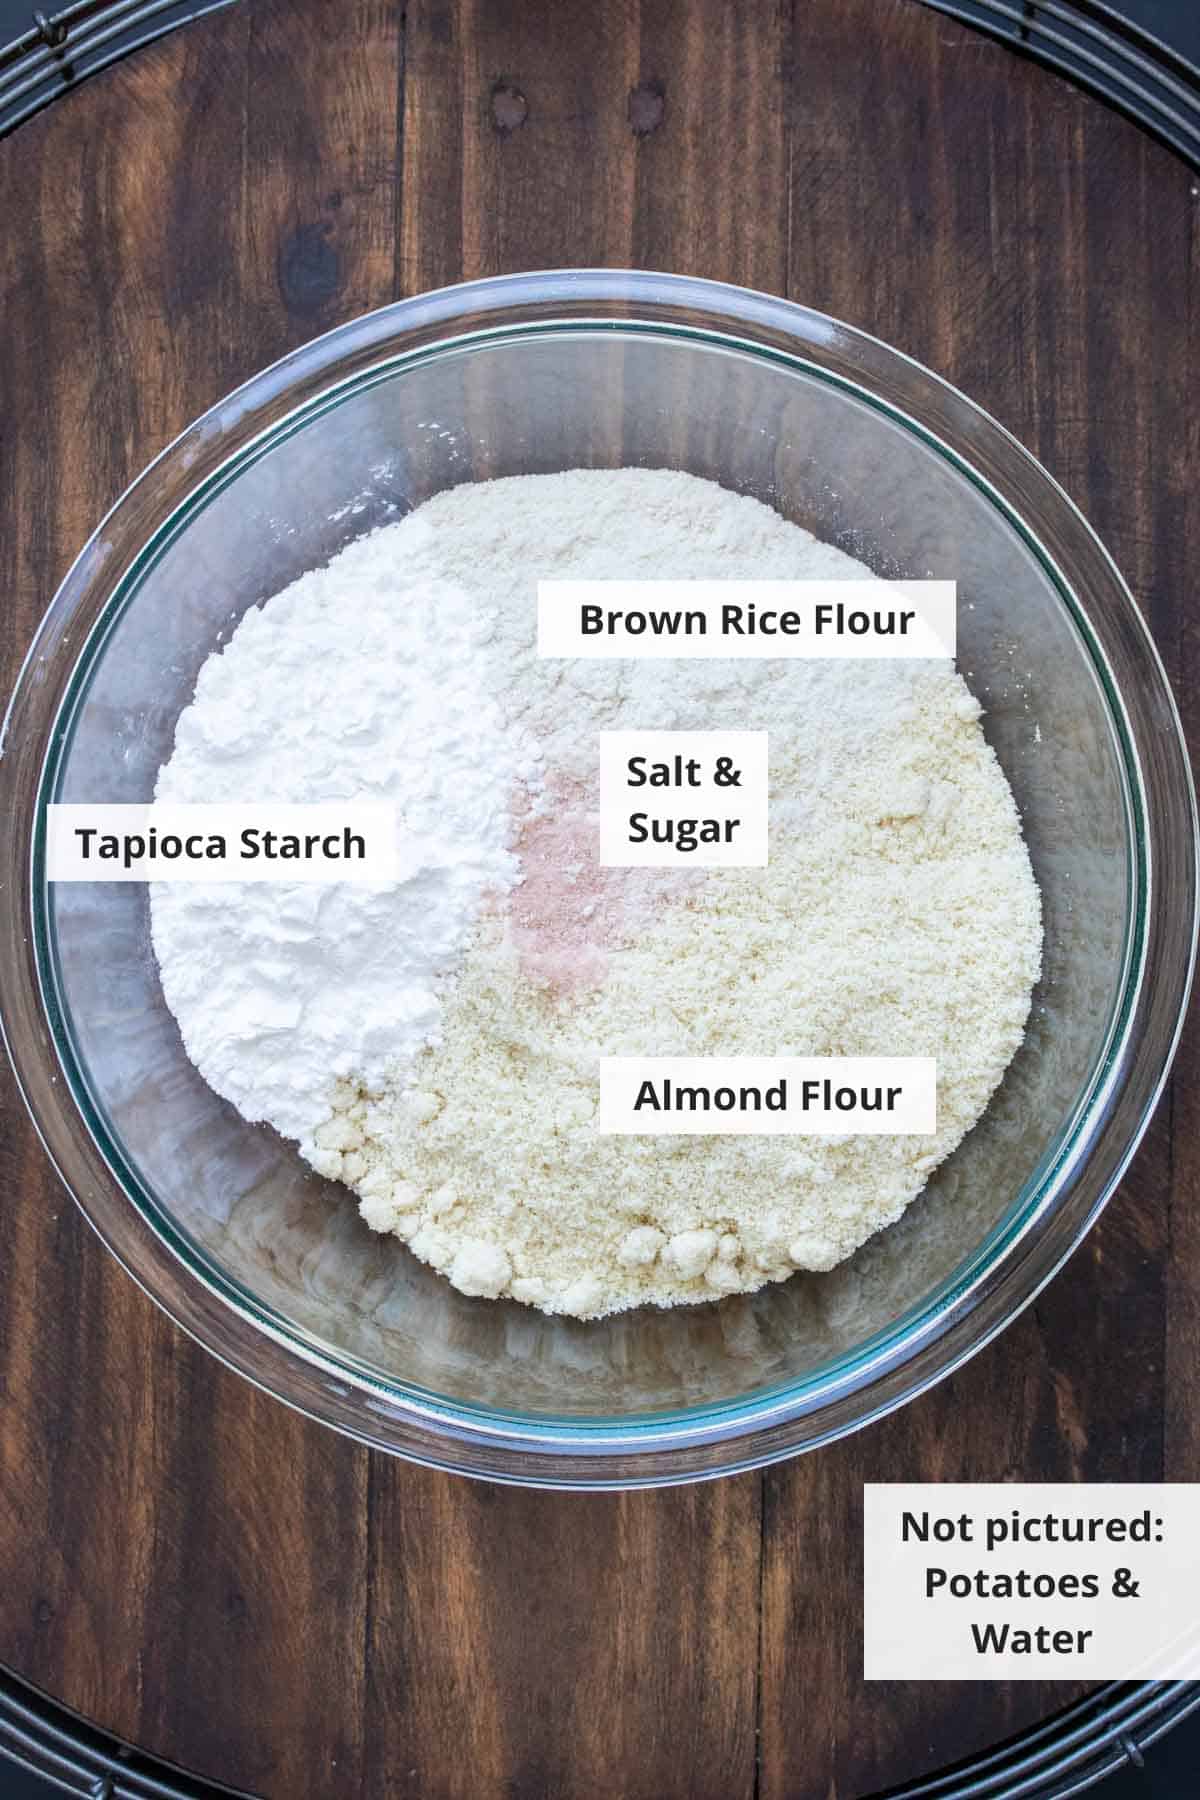
Almond Flour: This gives the crust a slightly sweet, rich flavor and helps keep the texture tender. I always use finely ground almond flour (not almond meal) for the smoothest results.
Brown Rice Flour: I use this to add sturdiness and structure to the dough without making it heavy. It helps the crust hold its shape once baked. While I have tested this with oat flour instead of brown rice flour, the crust won’t be as flaky if you make that substitution.
Tapioca Starch: This acts as a binder and adds a light, chewy texture that keeps the crust from crumbling apart. It also helps give the dough some flexibility when rolling.
Sea Salt: Just a touch enhances all the flavors, whether I’m making a sweet or savory pie. If I’m making a savory pie, I sometimes add a little extra salt for balance.
Cooked Potato: This is the secret ingredient that makes the crust flaky and moist without needing butter or oil. I use a baked or microwaved potato (never boiled) to avoid adding too much moisture. A Yukon Gold is my favorite because of its naturally buttery flavor. The main thing is that you want the potato to be smooth, so using a ricer is a great idea so you aren’t left with chunks.
Water: Water helps bring the dough together. The amount can vary depending on how much moisture is already in the potato, so I always start with less and add more as needed.
Cane Sugar (Optional): If I’m making a sweet pie like apple or pumpkin, I’ll sometimes add a little sugar to the dough to complement the filling. It’s totally optional and easy to leave out for savory recipes.
🔪 How To Make
My vegan pie crust recipe is a little different to work with texturally, compared to traditional doughs, but if you follow my instructions, it’s really straightforward. Here’s exactly how I make it:
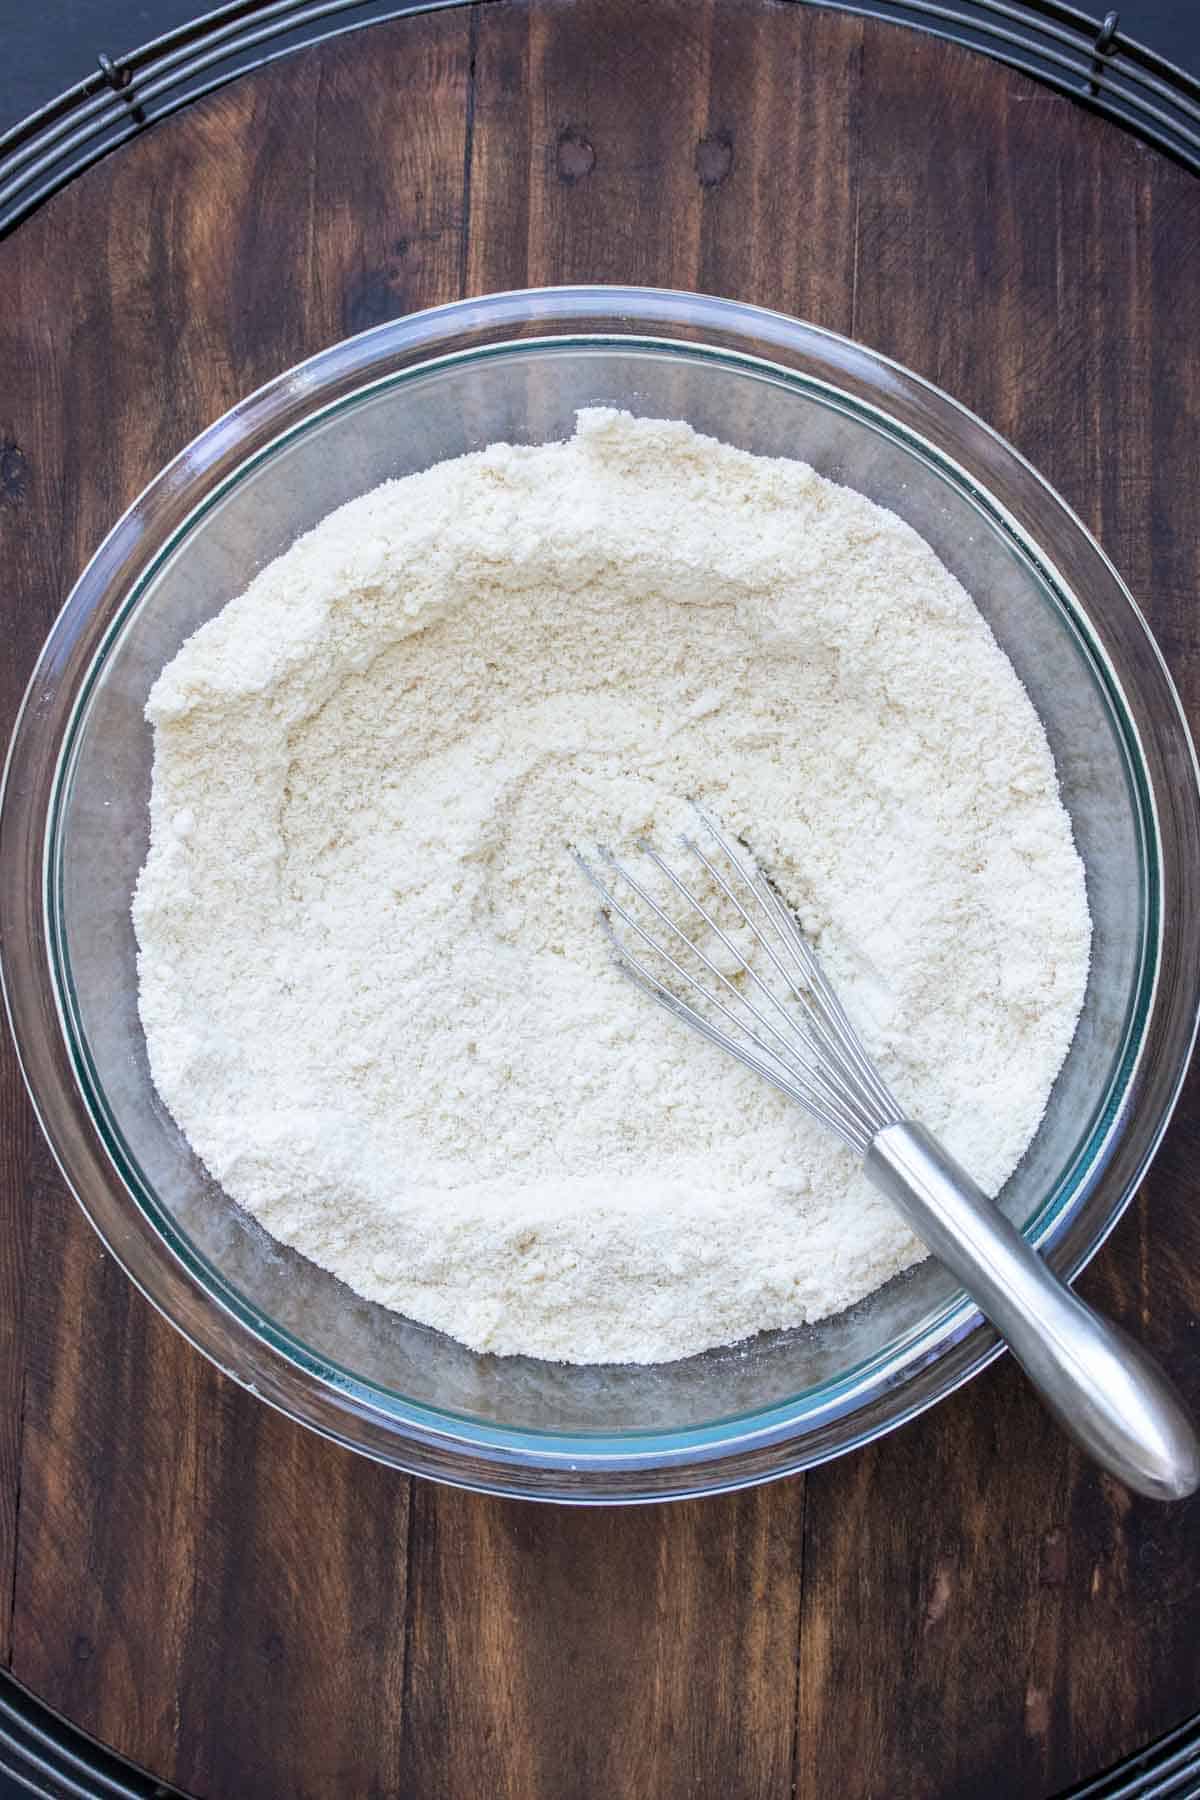
Mix Dry Ingredients: First, I whisk together the almond flour, brown rice flour, tapioca starch, and sea salt in a large bowl. Whisking not only combines everything evenly but also helps break up any clumps so the dough stays light and smooth.
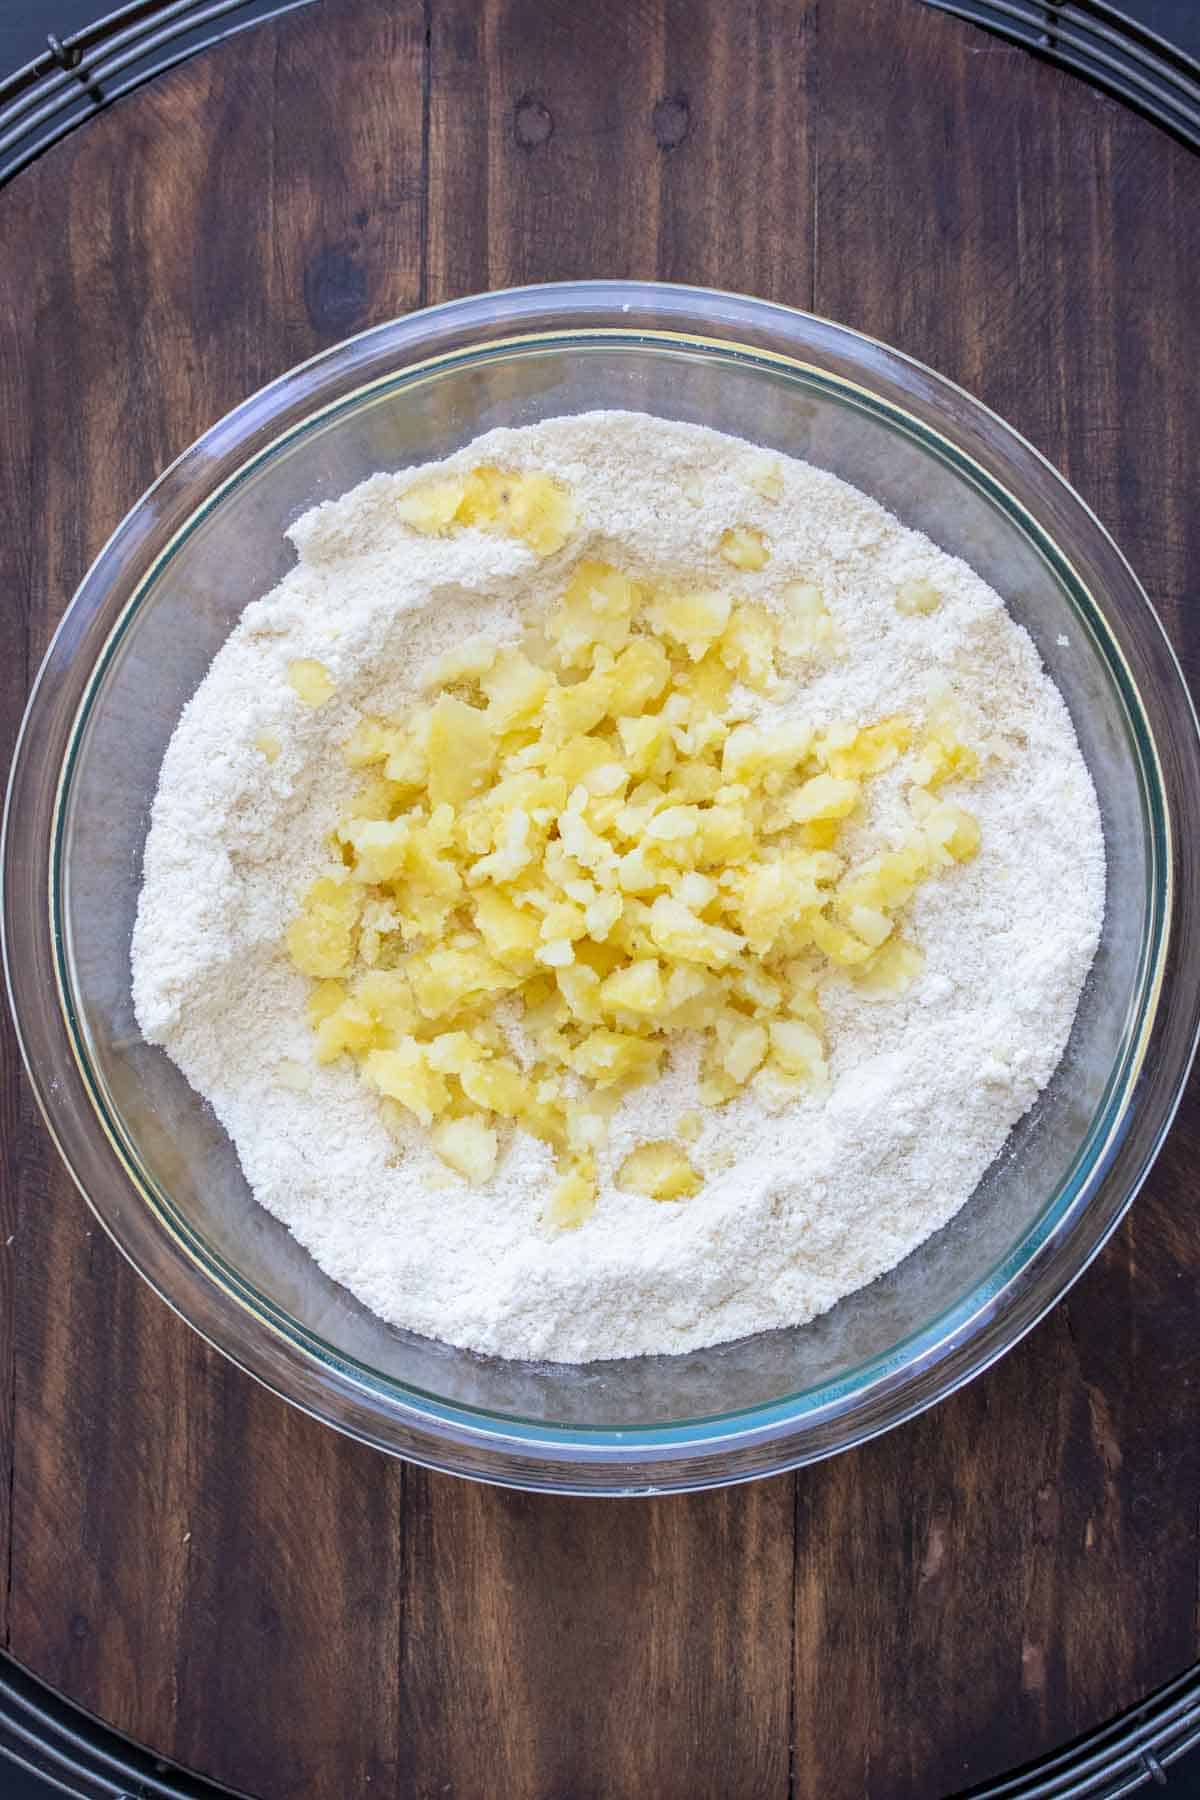
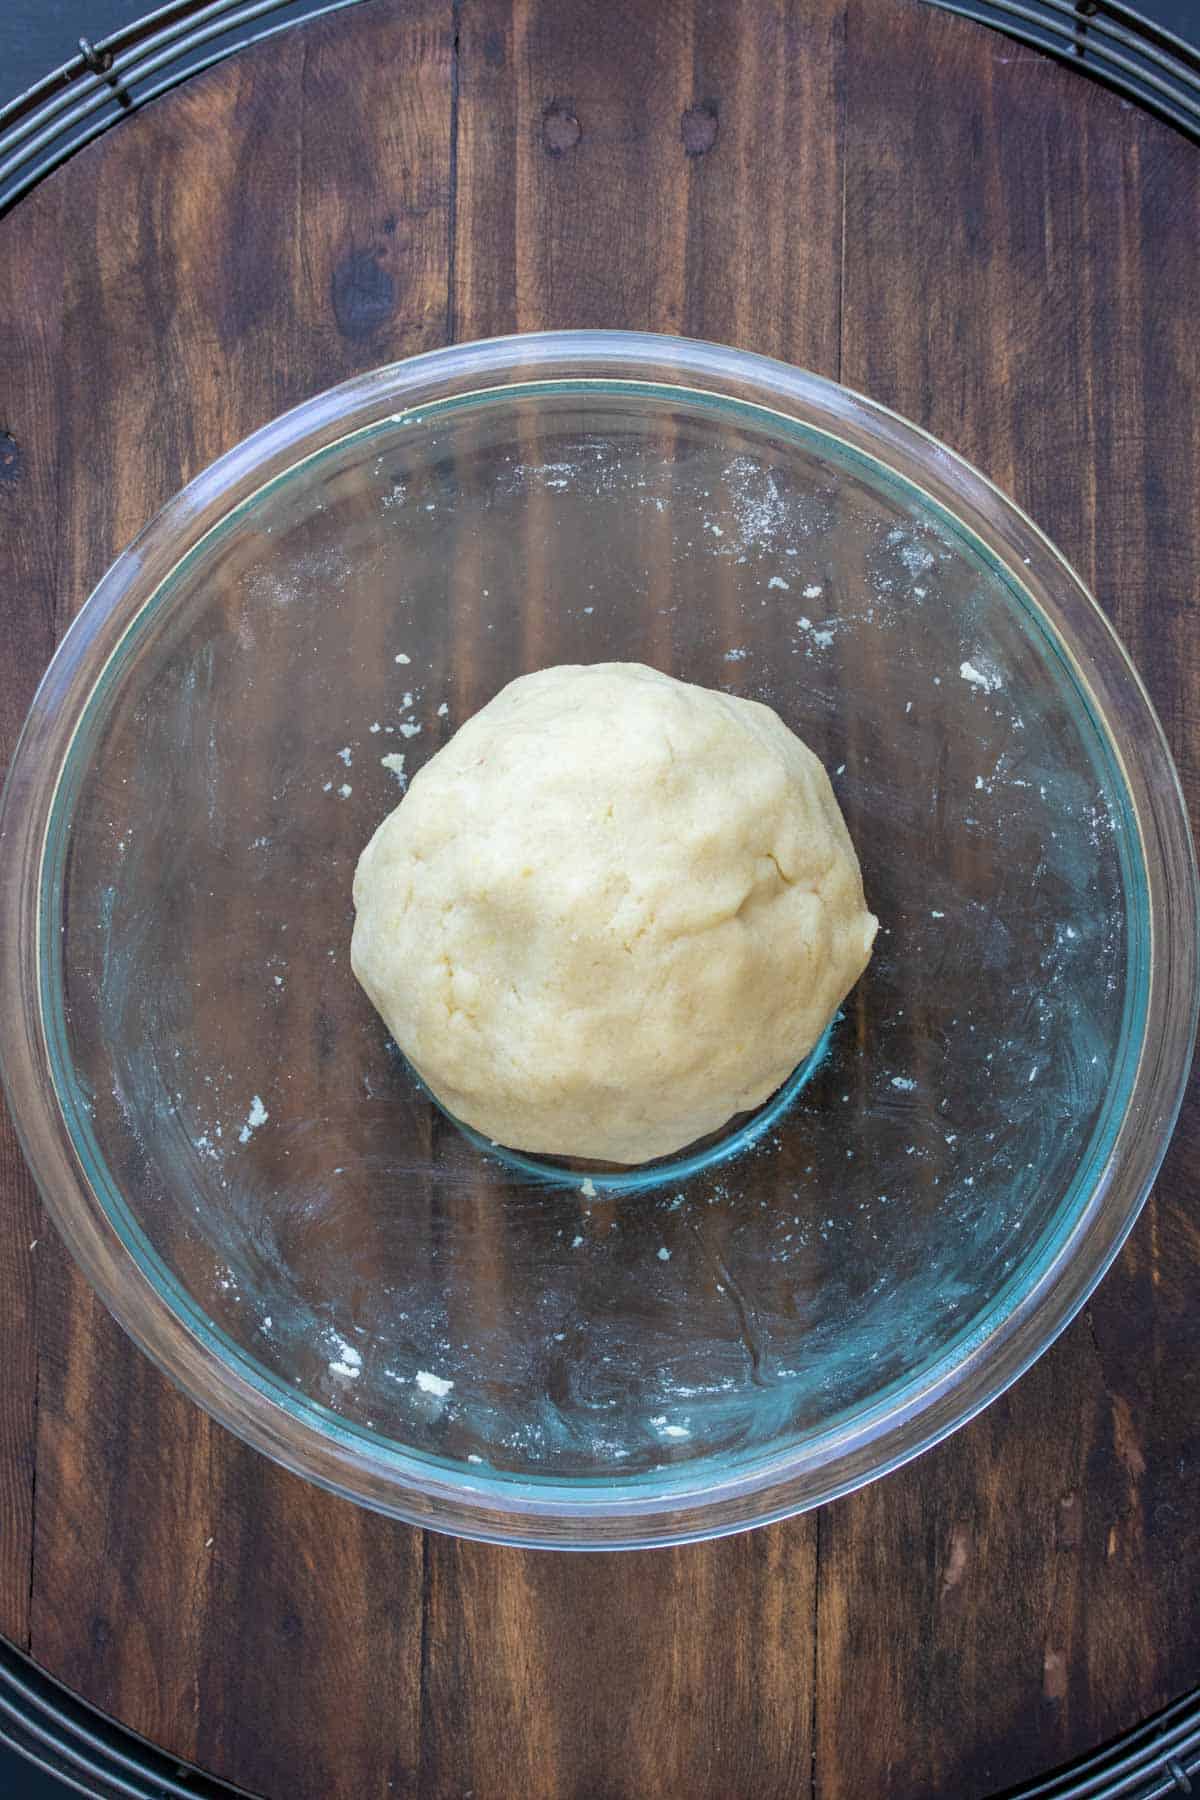
Add Potato & Water: Next, I crumble the cooked potato directly into the dry ingredients. If I have a potato ricer, I use it here to get the potato super fine and free of lumps, but if not, I just break it up with my hands. I add the water a little at a time and start mixing with my hands until a dough forms. The dough should come together easily, it shouldn’t stick to my fingers, but it also shouldn’t be dry or cracking.
Knead: Mix and knead well until you get a ball of dough. I used my hands. If I’m making both a top and bottom crust, I divide the dough into two equal pieces.
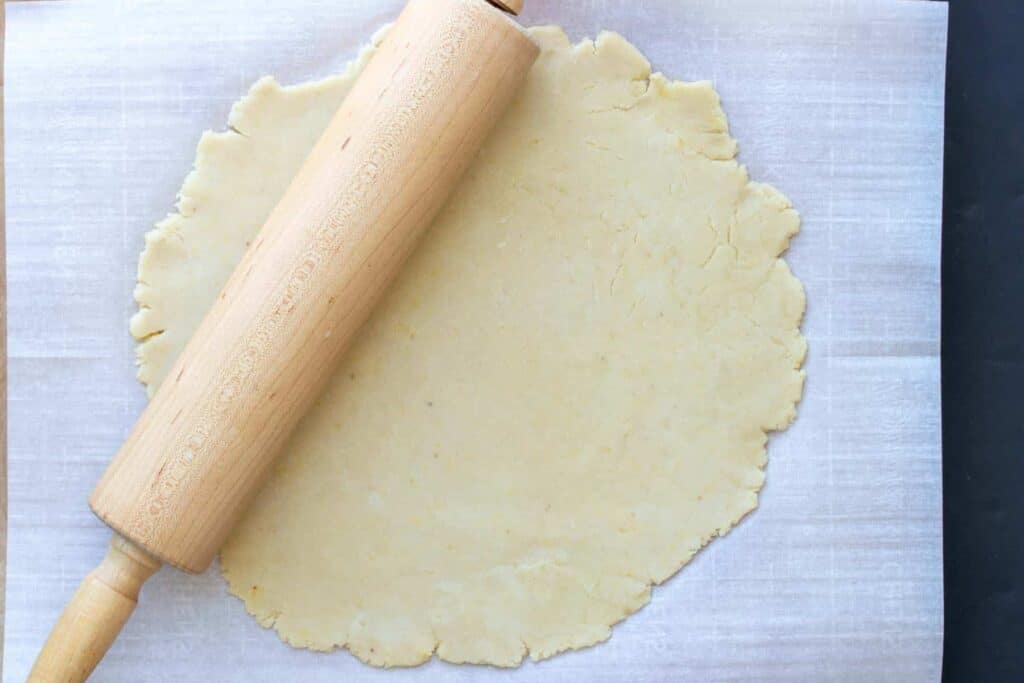
Roll Out: I flatten the dough slightly (either the whole dough or one half depending on whether I divided it up)and place it on a piece of parchment paper. Using a rolling pin, I gently roll it out into a circle that’s a little bigger than my pie dish, about ¼ inch thick. If the dough sticks to the rolling pin, I dust it lightly with a little extra brown rice flour.
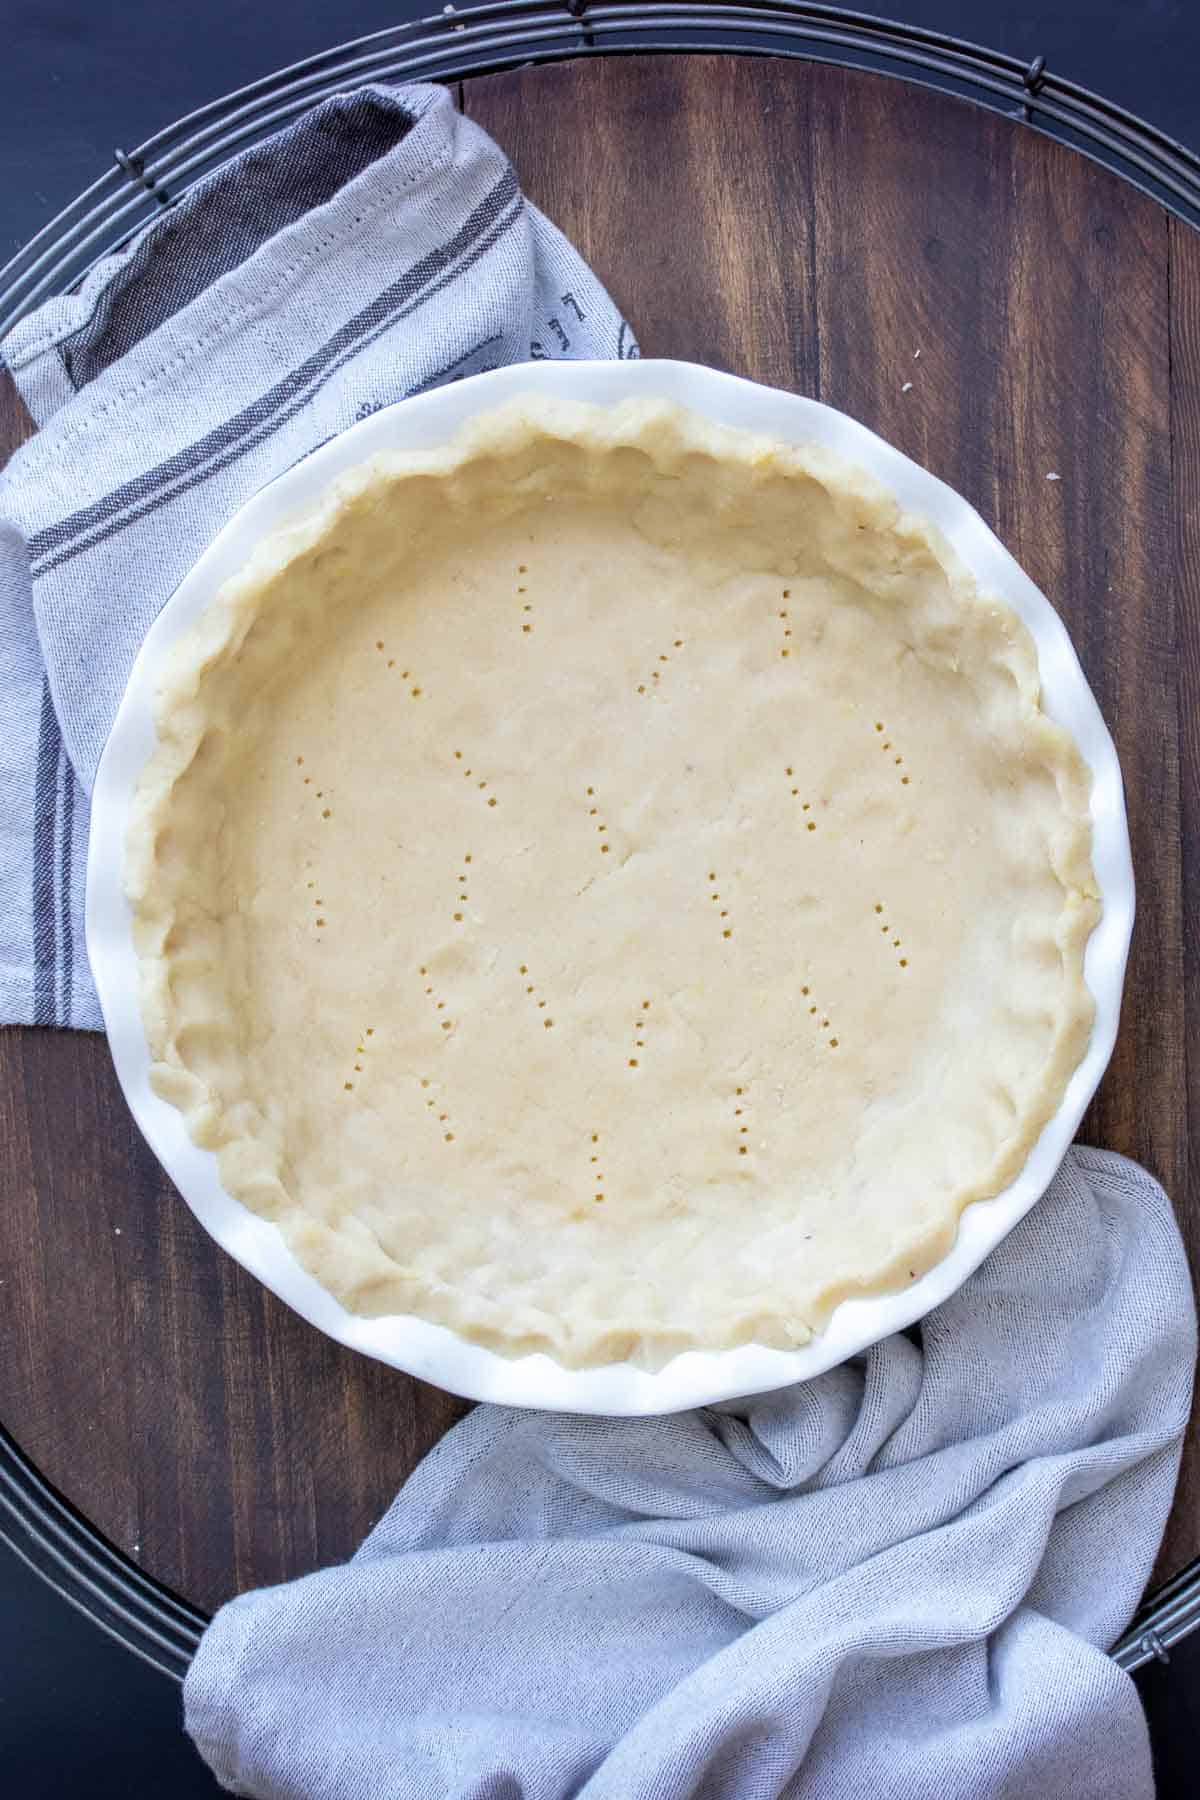
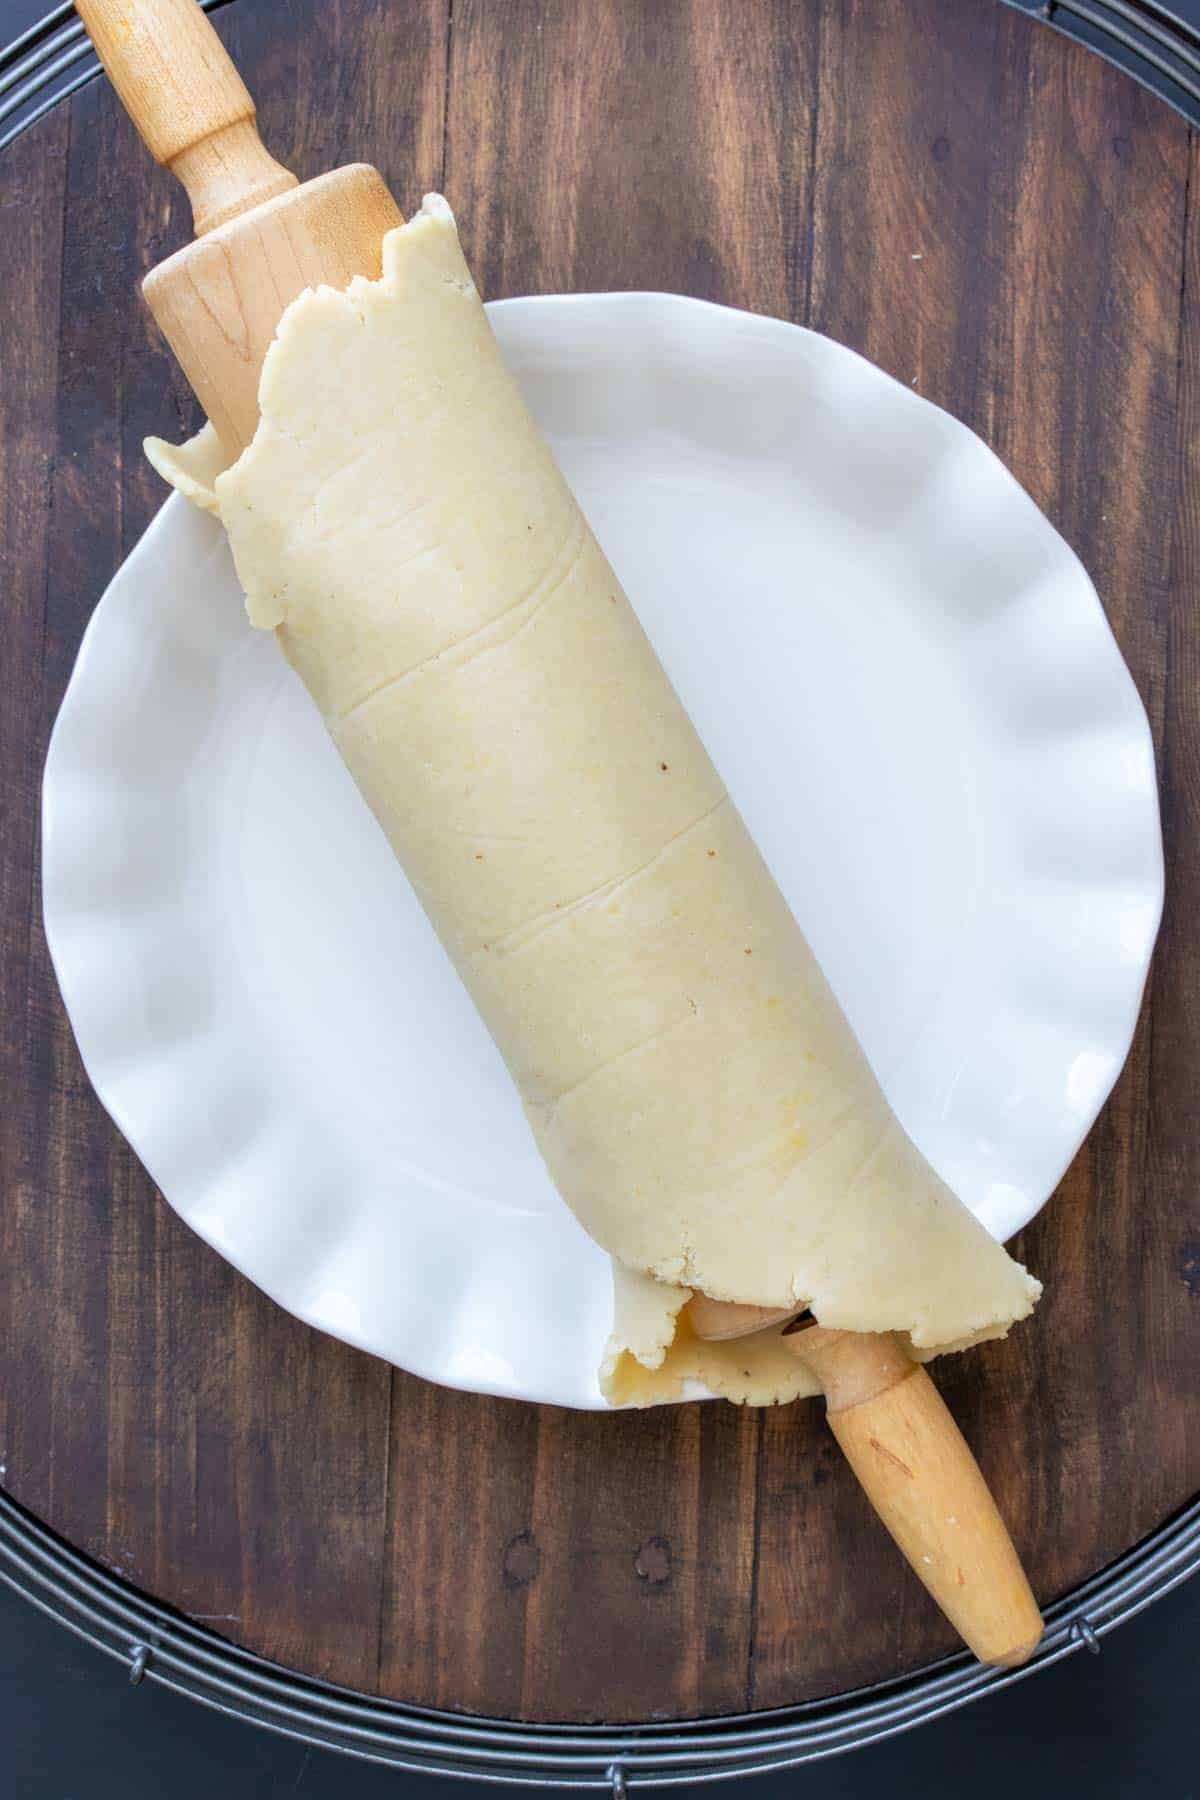
Transfer Crust: To transfer the crust, I roll the dough loosely around the rolling pin (using the parchment paper to help lift it if needed), then unroll it gently over the pie dish. If the dough cracks or breaks, I don’t worry, I just press it back together with my fingers right in the dish.
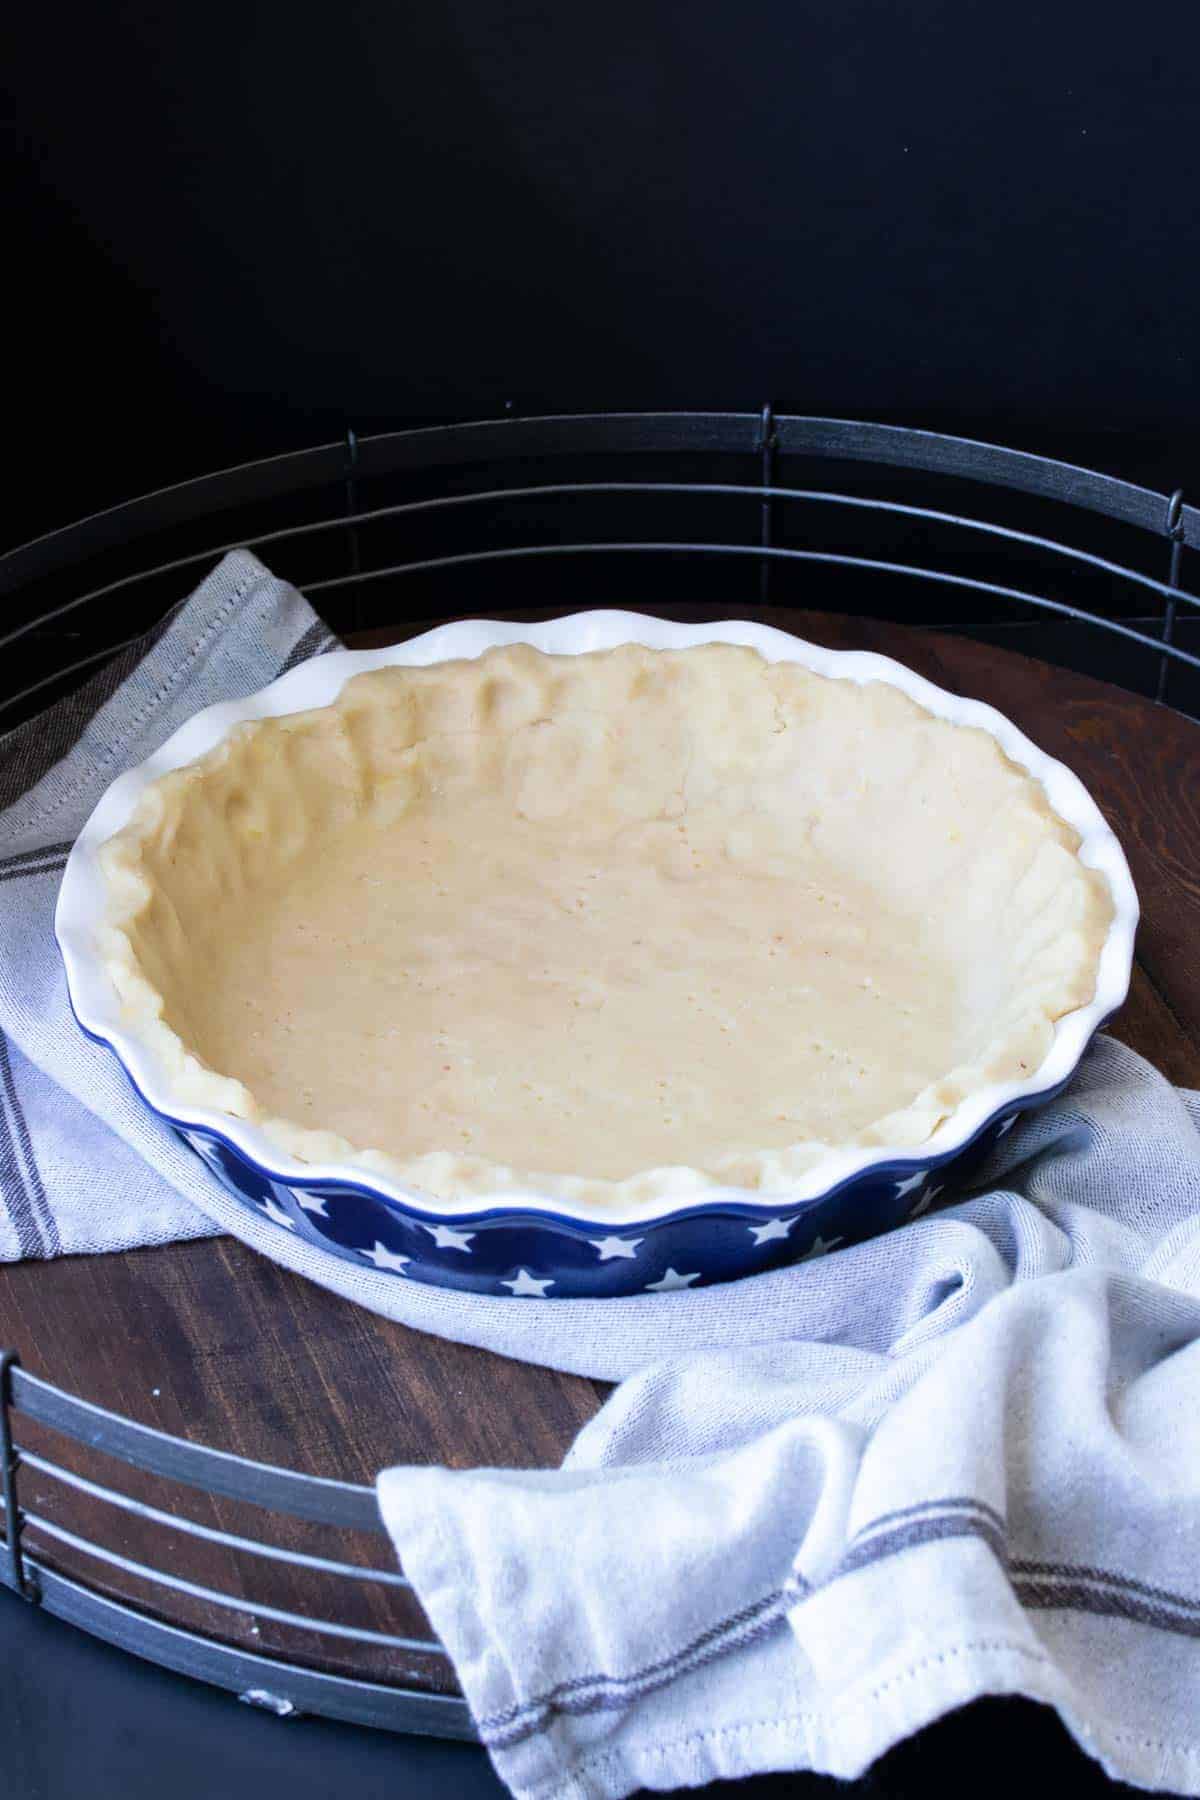
Shape Edges, Bake: Once the dough is in place, I press it gently into the bottom and sides of the dish. Then I use my fingers or a knuckle to pinch and shape the edges into a scalloped or decorative design.
If my recipe calls for a pre-baked crust, I bake it at 350°F for about 25 minutes, until it’s lightly golden and firm to the touch. If I’m filling it before baking (like for a pumpkin pie), I follow the baking instructions outlined in the recipe I’m making.
💭 Expert Tips
My #1 Secret Tip for this recipe is to take it slow and don’t rush! This dough needs a little patience and a gentle touch. I always take my time mixing and kneading it by hand to make sure it’s evenly hydrated and smooth. If it’s too dry or crumbly, I massage in a tiny bit more water. If it’s too sticky, I sprinkle on a little brown rice flour until I get the texture I want.
Other Tips To Keep In Mind:
- Weigh Your Flours: For the best texture, I like to use a kitchen scale and measure precise weights. It helps avoid accidentally packing too much flour into the measuring cups, which can make the crust dry. If you don’t have a scale, then you can purchase this fairly inexpensive one.
- For Measuring Without A Scale: If you prefer to measure, then measure the flours by scooping your measuring cup into the flour versus spooning it into it. This is how I measured when getting my weights.
- Use Parchment Paper To Roll Out The Dough: Rolling directly on the counter can make transferring tricky. I always roll my dough between two pieces of parchment paper, it’s easier to lift and move without tearing.
- Make Sure Your Potato Isn’t Too Wet: I bake or microwave the potato instead of boiling it. Boiling adds too much moisture, which can make the dough too soft and hard to handle.
- Dough Cracks Are Fixable: Small cracks or breaks are normal with gluten-free dough! I just gently press the edges back together in the pie dish. No one will notice once it’s baked. Also, when rolling out, if your dough falls apart too easily then roll back into a ball and wet your hands to massage a little more water into it.
- For Sticky Dough: If your dough is too sticky then sprinkle some brown rice flour onto the parchment paper when rolling out.
- For Transferring: When transferring to a pie dish, use the parchment to help roll the dough onto the rolling pin. This helps keep it from breaking.
📖 Variations
This crust is already super versatile, but there are a few easy tweaks you can make depending on what kind of pie you’re baking, or just based on what ingredients you have on hand.
Sweet Or Savory Crust: If I’m making a dessert pie like vegan apple pie or vegan pumpkin pie, I’ll sometimes add 2 to 3 teaspoons of cane sugar to the dough for a hint of sweetness. For savory recipes like vegan pot pie, I skip the sugar and may add an extra pinch of salt or even a bit of dried thyme or rosemary for flavor.
Decorative Pie Toppers: This dough is easy to shape, so I love making lattice tops, braided edges, or cookie cutter shapes for holiday pies. If it starts to get dry while shaping, I just wet my hands and massage it gently until it’s workable again.
🍽 Serving Suggestions
This pie crust is one of those recipes I come back to again and again because it works with just about everything.
If I’m making a sweet pie, this crust pairs perfectly with literally any filling: a classic cherry pie in the summer, an apple pie or vegan pumpkin pie in the fall, or a lemon pie in the spring!
For savory recipes, I love using it for my vegan pot pie, as a crust base for veggie tarts or galettes, or even rolled thinner for things like baked samosas or hand pies.
🧊 Storage Directions
Refrigeration (For Unbaked Dough): Once I’ve mixed the dough and formed it into a ball, I wrap it tightly in plastic wrap and place it in an airtight container or zip-top bag. It keeps well in the fridge for up to 3 days. If the dough is a little firm or dry when I take it out, I let it sit at room temperature for about 20–30 minutes, then knead it gently with slightly wet hands to soften it up before rolling.
To Store A Baked Crust: If I bake the crust on its own (for a no-bake filling), I let it cool completely, then store it covered at room temperature for up to 2 days, or in the fridge for up to 5 days.
Freezing: There are two ways I like to freeze this crust: 1) Freeze the dough ball – I wrap it tightly in plastic wrap, then again in foil, and store it in a freezer-safe bag or container. It lasts up to 3 months. When I’m ready to use it, I thaw it in the fridge overnight, then let it sit on the counter to come to room temp before rolling. 2) Freeze in a pie dish: I press the crust into a pie pan, wrap it tightly in plastic and foil, and freeze it flat (it will stay for about 3-4 months this way). This is perfect when I want a quick start for a future pie, I just thaw it slightly, then fill and bake as needed.
❓Recipe FAQs
My dough is cracking or too dry, what should I do?
That usually means it needs a little more moisture. I wet my hands slightly and knead a bit more water into the dough until it holds together without cracking. If it’s too sticky, I dust it with a little brown rice flour.
Do I need to pre-bake this crust before adding filling?
It depends on your filling. If you’re making a pie with a very wet filling (like pumpkin or custard), I recommend par-baking the crust for 10–15 minutes before filling, which helps prevent a soggy bottom. For other pies, just follow the baking instructions in your pie recipe.
🥧 More Delicious Pie Recipes!

Love this plant based dessert recipe? Please leave a 5-star rating 🌟 in the recipe below and/or a review in the comment section further down the page!
You can also FOLLOW ME on FACEBOOK, INSTAGRAM, and PINTEREST to see more delicious, healthy, family-friendly food, and if you have any questions, I’m here to help!
📋 Recipe Card

Healthy Vegan Pie Crust (Gluten-Free)
My vegan pie crust recipe is not only gluten-free and oil-free, but is made with healthy whole food ingredients. It's simple, flaky, and absolutely delicious!
Servings: 2 whole pie crusts
Calories: 1205kcal
Ingredients
- 2½ cups fine grained almond flour
- ½ cup brown rice flour
- ½ cup tapioca starch
- ½ teaspoon sea salt , see note
- ¾ cup cooked potato , see note
- 6-8 tablespoons water , see note
- 2-3 teaspoons cane sugar , optional if making a sweet pie
Instructions
- If baking pie, preheat oven to 350 degrees F / 175 C.
- Put flours, starch, and salt in a bowl. Whisk well to remove clumps and combine.
- Crumble potato in. Using a potato ricer works really well to break up chunks. Add in water. Using your hands begin to mix. Continue until a ball of dough forms. It shouldn’t stick to your hands but also shouldn’t be dry and cracking.
- Divide ball in half if making the full recipe.
- Flatten half the dough on a piece of parchment paper. I find this works best for when you transfer to a pie dish.
- Using a rolling pin, roll out until you get a circle a little but larger than your pie dish. It should be about ¼ inch thick. If needed, use a little bit of the brown rice flour to avoid the rolling pin from sticking to the dough.
- When done, roll the rolling pin over the dough as you wrap the dough around the pin (see post for photos).
- Put the rolling pin on one edge of your pie pan and slowly unroll removing the dough from the pin and over the pie dish. If some dough breaks off, that’s okay because you can easily press it back together into the dish.
- Using your fingers, press the dough into the pie dish pinching the top to make a scalloped like design.
- Fill as needed by the recipe (or bake if recipe calls for it).
- If baking it on it's own, I found that 25 minutes was perfect texture.
Notes
- I used a Yukon gold potato, but any other white potato will work.
- Do not boil potato to cook it or it will have too much moisture. I cooked it in the microwave but you can bake it too.
- Amount of water will depend on how moist your potato is. Start with 6 and add more to dough if needed.
- If making a savory pie, you can add more salt if you want.
- If making a sweet pie, add the sugar if you prefer, but it is not needed.
- This makes 2 pie crusts. Nutrition facts are for ONE WHOLE PIE CRUST, without filling. Divide by the number of slices you cut to determine the nutrition facts for one slice.
Nutrition
Serving: 1whole pie crust | Calories: 1205kcal | Carbohydrates: 111g | Protein: 34g | Fat: 78g | Saturated Fat: 6g | Polyunsaturated Fat: 3g | Monounsaturated Fat: 4g | Sodium: 787mg | Potassium: 457mg | Fiber: 19g | Sugar: 10g