

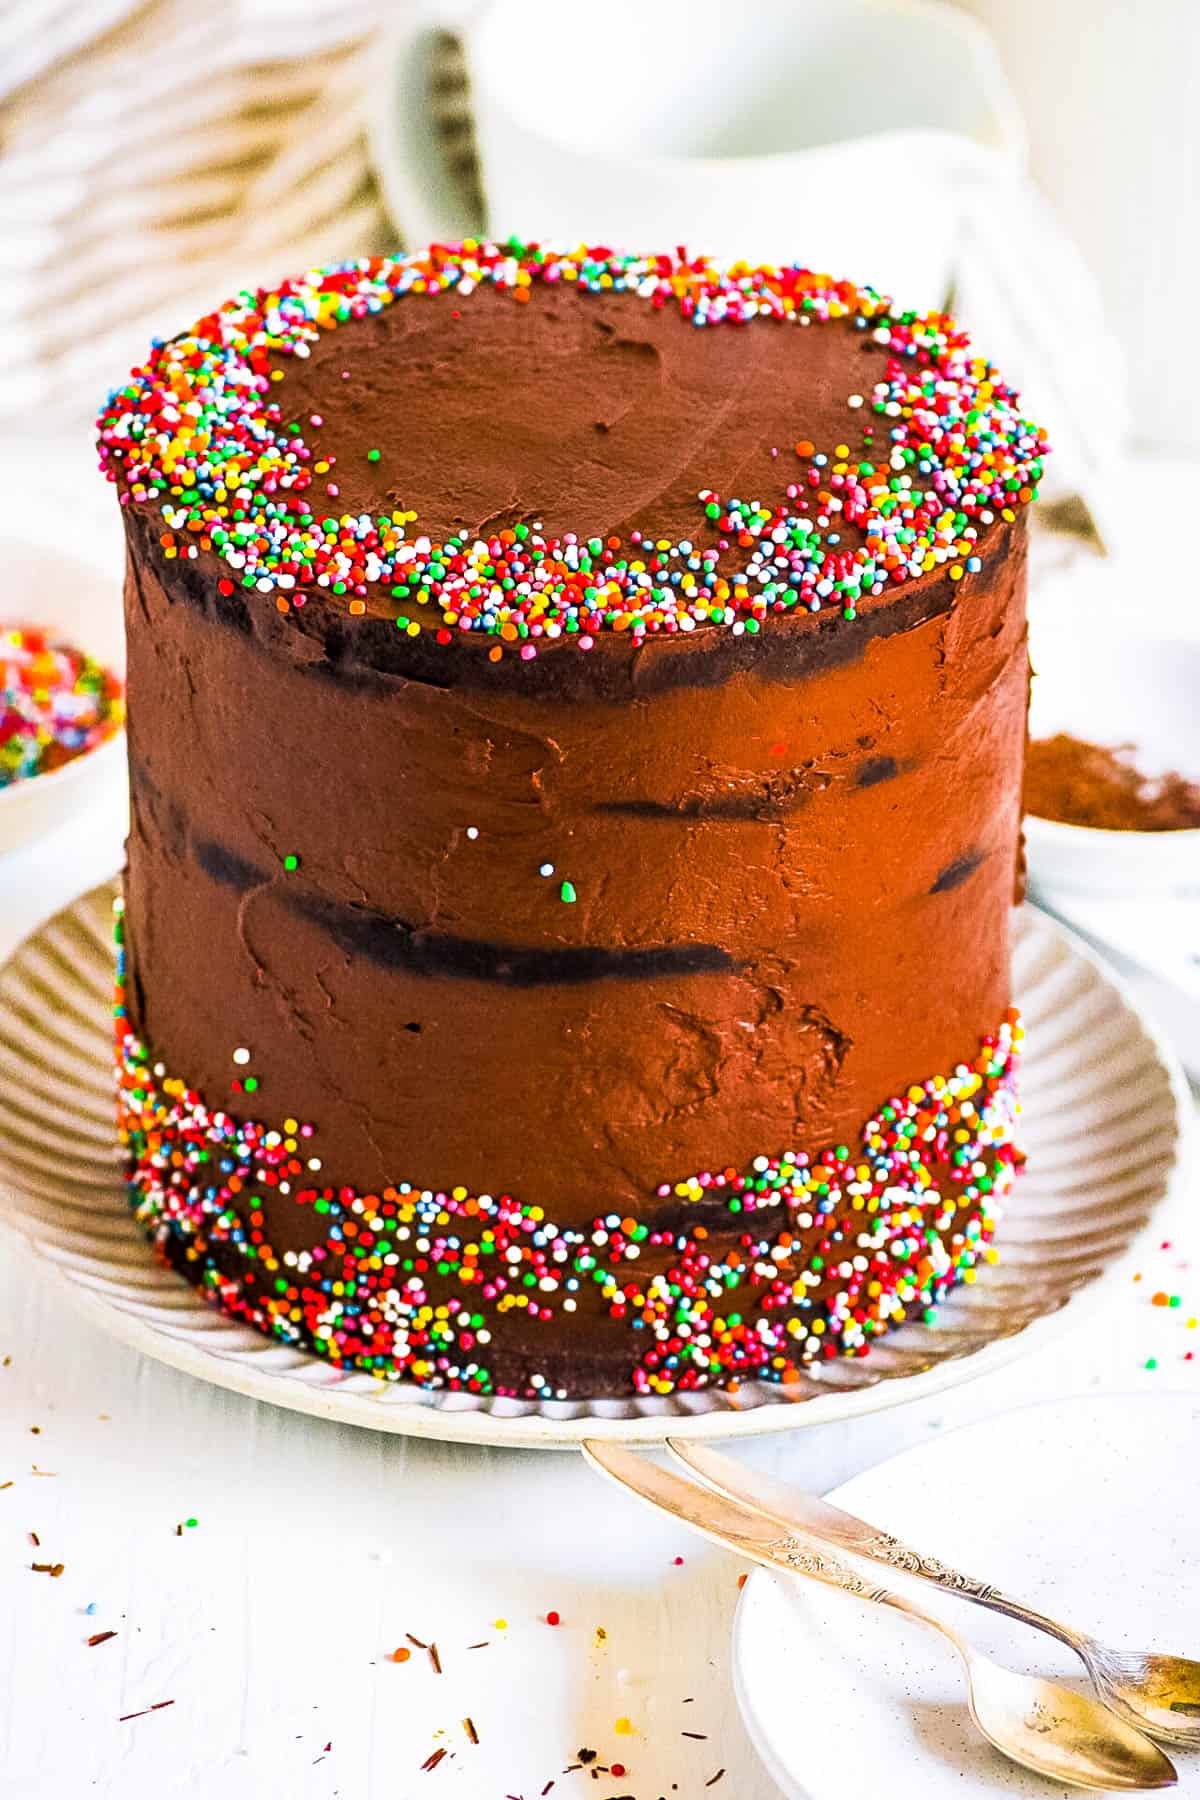
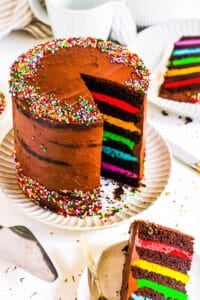
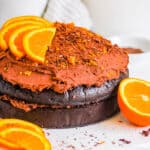
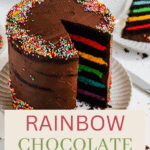
Rainbow Chocolate Cake
This post may contain affiliate links. As an Amazon Associate, I earn from qualifying purchases. Please read my disclosure.Nothing beats a decadent rainbow chocolate cake to celebrate any special occasion with your loved ones. I make it with cocoa powder, rich dark chocolate ganache, and vibrant food coloring to create a stunning layered dessert. This colorful creation is loved by both kids and adults alike.

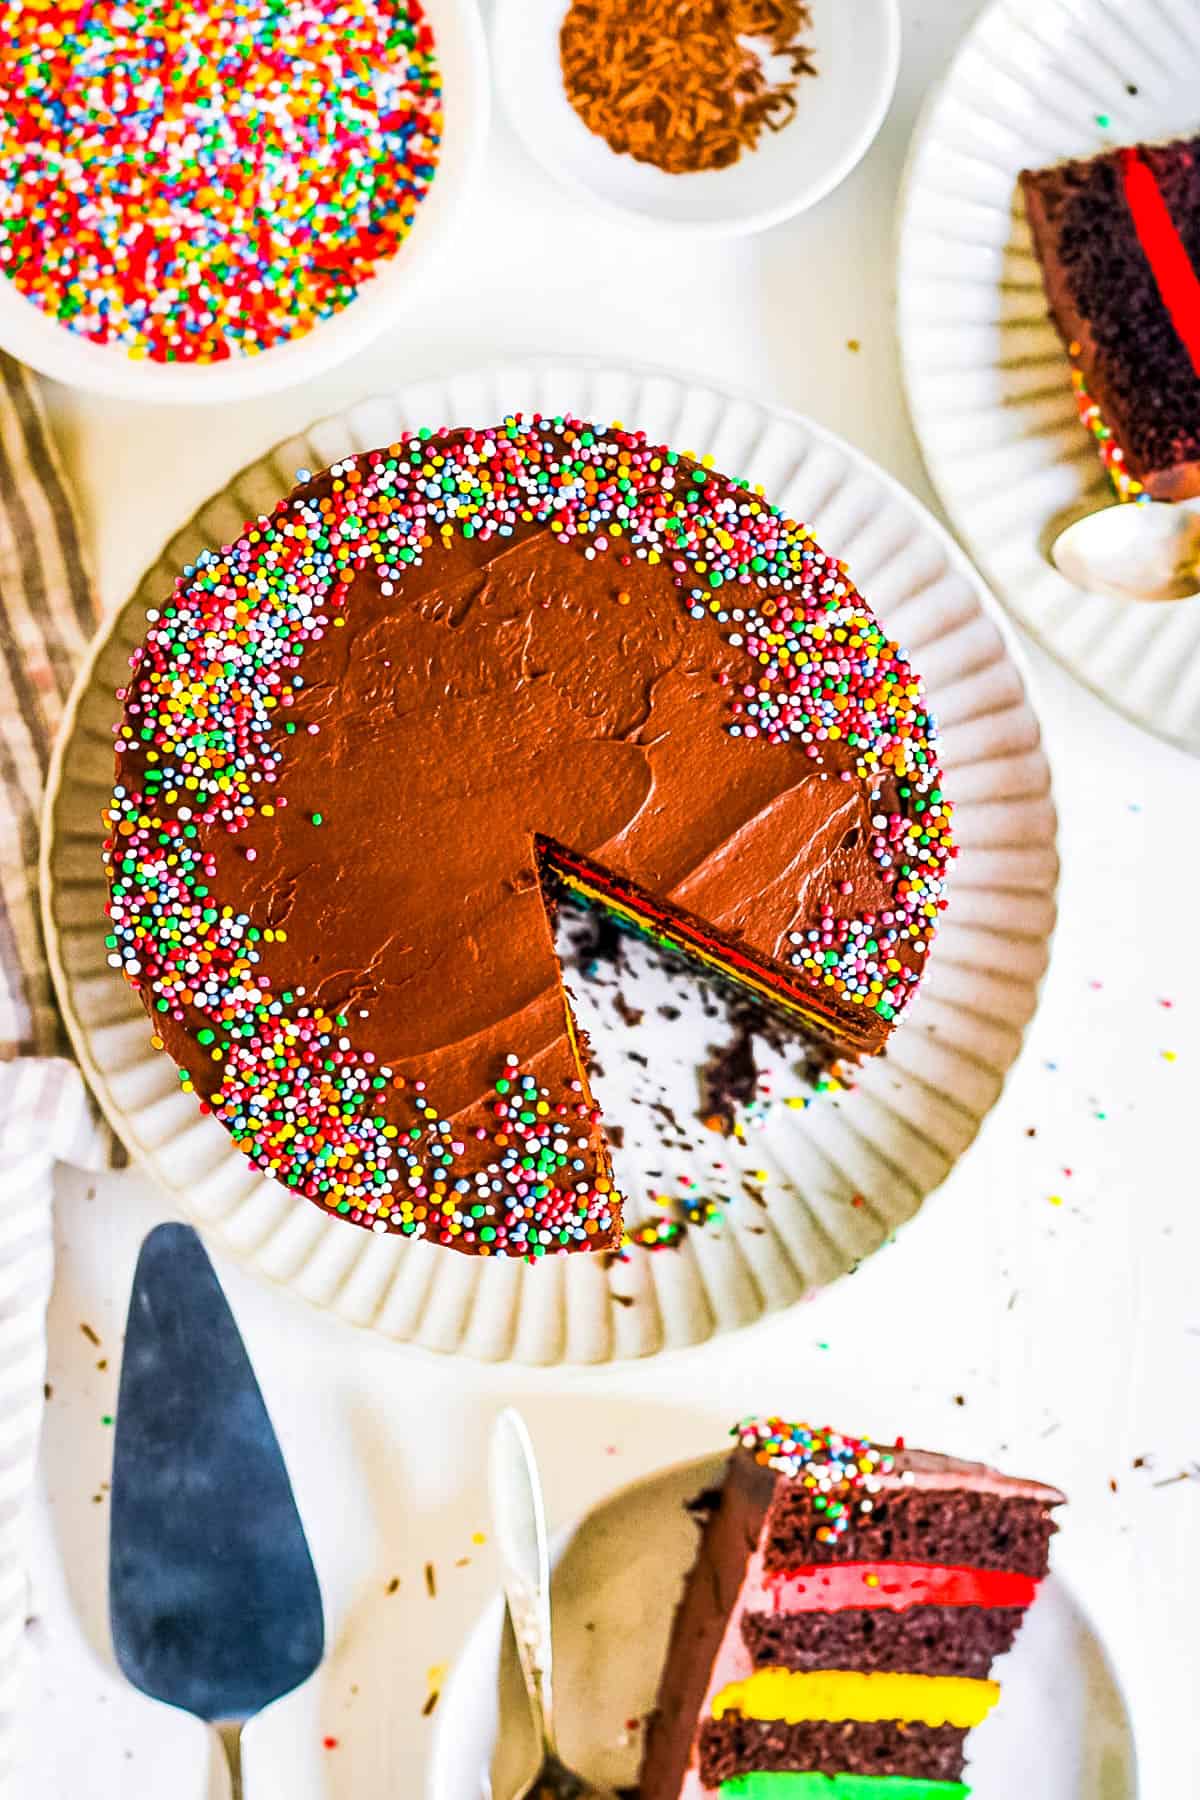
Layered chocolate cakes have always had a very special place in my heart, whereas my kids adore the vanilla rainbow variety. Unlike my equally decadent chocolate mango cake, the layers here are hidden and unexpected. The deep cocoa flavor balances the sweetness of the frosting, which can be tricky when it comes to cakes.
I first created this cake when my kids could not decide between a vanilla rainbow sponge or my chocolate walnut cake. Why not have both? I aimed for that signature chocolate cake flavor, with the bright and cheerful colors incorporated. Of course, my kids could not fathom how a cake could be both rainbow and chocolate. But boy, were they surprised and impressed!
👩🏽🍳 Why I Love This Recipe
This recipe combines two of my favorite things: chocolate and bright, dazzling colors, and that is why I love it! As a nutritionist and a mom, I value baked goods that are homemade with recognizable ingredients like cocoa powder and almond milk, along with the added WOW factor. This cake is great for birthdays, school parties, and milestones. I especially love making it when I know that the event calls for lots of photographs. Not only does this rainbow chocolate cake plate well, but it photographs even better! From the deep color of the ganache to the brilliant creamy center.
The structure holds well, thanks to the addition of baking soda, baking powder, and lemon juice. These all work together to create a lift and a light crumb. It is fluffy without being dry thanks to the oil, while the instant coffee helps enhance the natural chocolate flavor. And let us not forget the benefits of dark chocolate. People easily forget that it promotes heart health, improves blood flow and pressure, reduces cholesterol, and is a great source of antioxidants. Talk about having your cake and eating it, too. Ha!
Since this cake features hidden layers, I thought it would be the ideal centerpiece for my husband’s surprise birthday party. I am not the best at pulling off a surprise party, but I decided to really commit. While he maintains that the event itself was a surprise, his reaction did seem a bit rehearsed. Ha! I tried. I do know for sure that he was surprised when he cut into the cake. To every it just looked like a tall chocolate cake with some rainbow sprinkles, but the gasps were audible when the layers made their dramatic reveal. I absolutely recommend making this for your next event. But maybe do not tell anyone about the rainbow center 🙂
Latest Recipe Video!
🥘 Ingredients
This cake looks fancy, but I made sure to keep the ingredients simple. I use pantry staples to build these rich layers.
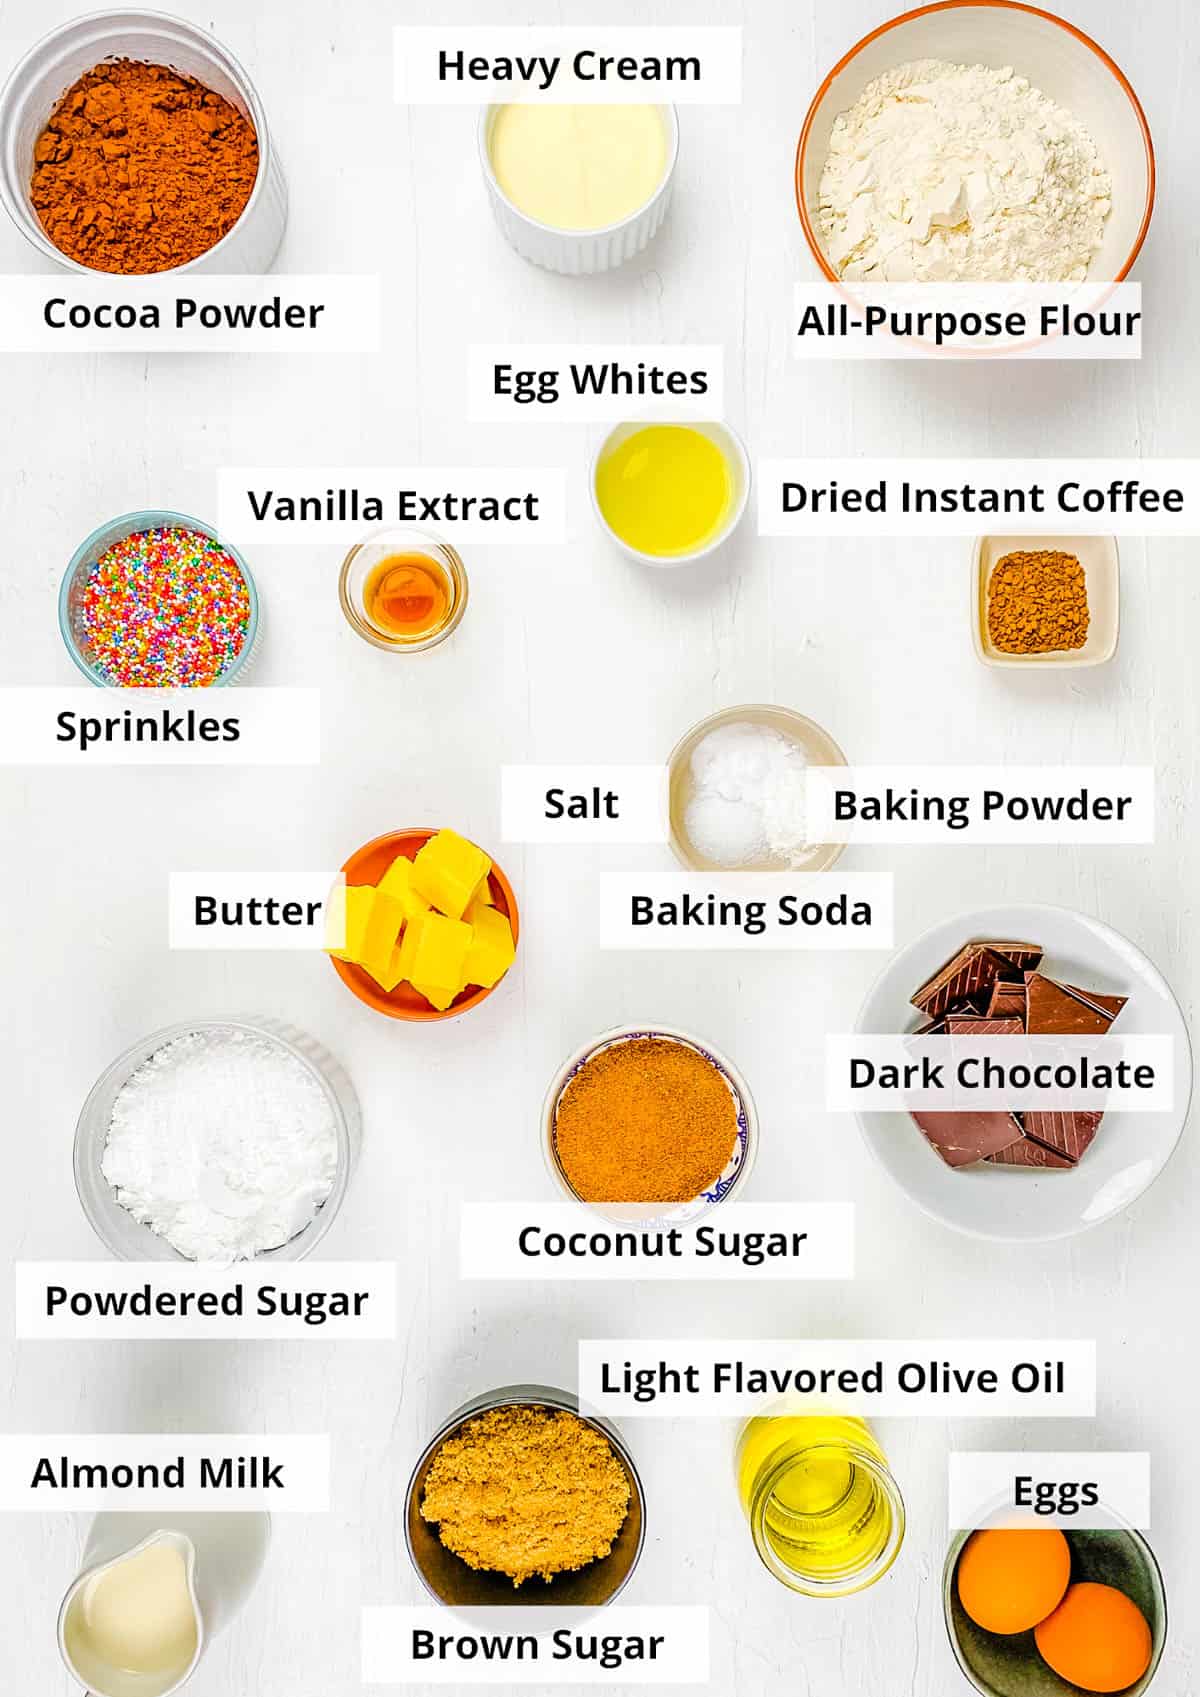
For The Cake
Almond milk: I use this as the base liquid to keep the crumb soft and moist.
Brown sugar: I add this for deep caramel notes that complement the cocoa.
Coconut sugar: This rounds out the sweetness, which I love.
Salt: A small amount of salt sharpens the chocolate flavor and removes any bitterness from the coffee.
Baking soda: I rely on baking soda for the initial lift when baking.
Baking and cocoa powder: Both ingredients are key to make this recipe.
All-purpose flour: I use all-purpose flour to ensure structural stability within my layers.
Light-flavored olive oil: A mild-flavored olive oil adds to the moisture and keeps my cake from drying out.
Vanilla extract: For all things chocolate I love a bit of vanilla to bring all the flavors together.
Eggs: I use eggs to bind the batter and add another level of richness.
Dried instant coffee: Like vanilla, dried instant coffee is so well-suited to any chocolate dish, adding a dimension to the flavor.
For The Buttercream
Egg whites: I always use pasteurized egg whites for a light, structured frosting.
Powdered sugar: This blends seamlessly into my frosting and adds sweetness.
Butter: Softened butter is the main event in all my buttercream frostings
Vanilla extract: I use vanilla extract to add a roundness and counteract any obvious buttery flavor, not suited to sweet dishes.
Food coloring: I use bright colors to create my rainbow layers.
For The Ganache
Dark chocolate: Finely chopped dark chocolate is ideal for melting and is not too sweet, adding another layer of balance.
Heavy cream: This transforms my melted chocolate into smooth, spreadable, glossy ganache.
🔪 How To Make
I prepare this cake, step by step, to ensure an organized, baking, and assembly process.
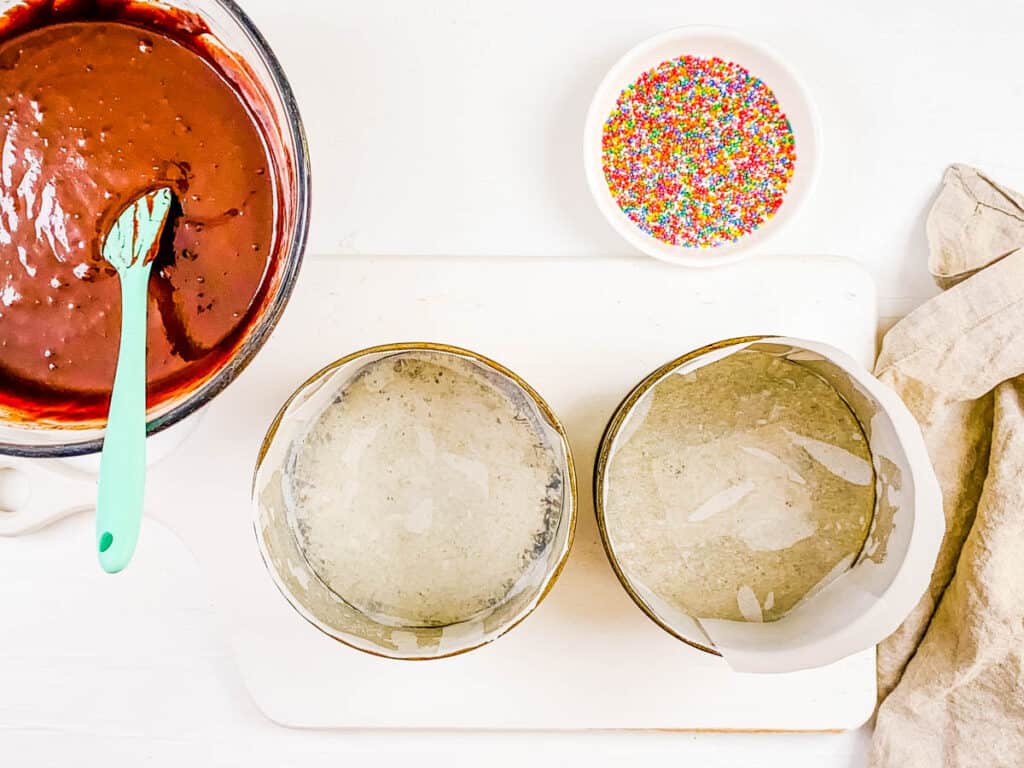
Preheat and prepare: I preheat my oven to 350F, and line my cake tins with parchment paper. Then I whisk my almond milk and lemon juice, and let it sit briefly.

Whisk dry ingredients: In a separate bowl,l I whisk the brown sugar, coconut sugar, salt, baking soda, baking powder, cocoa powder, and flour until fully combined.
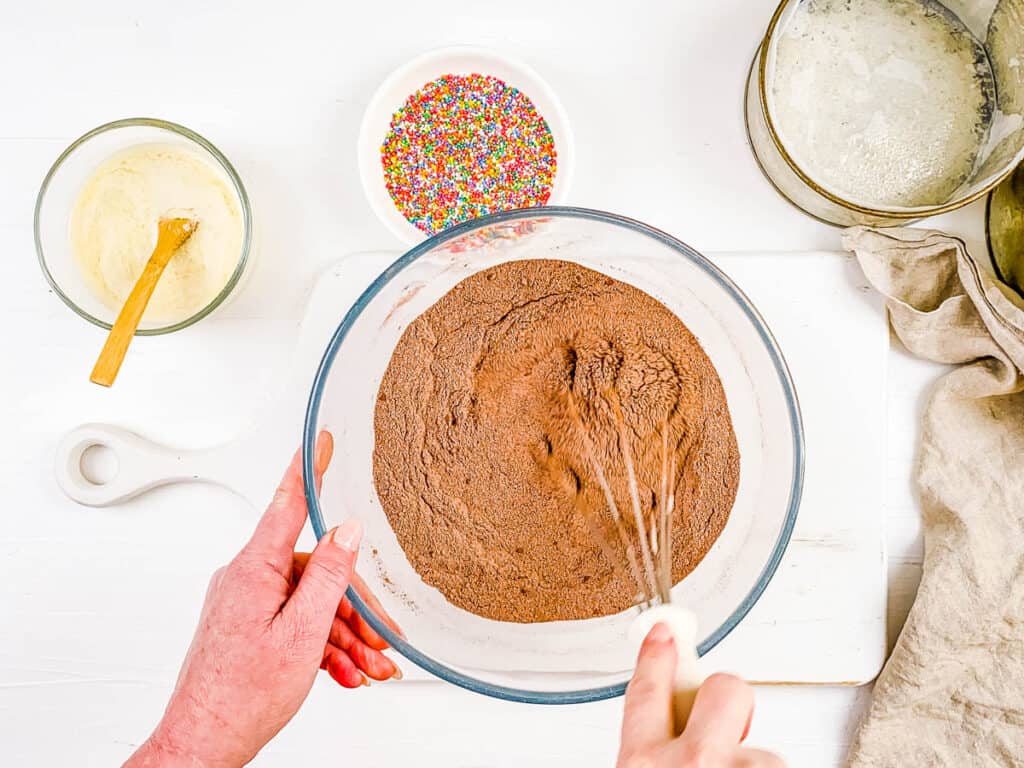
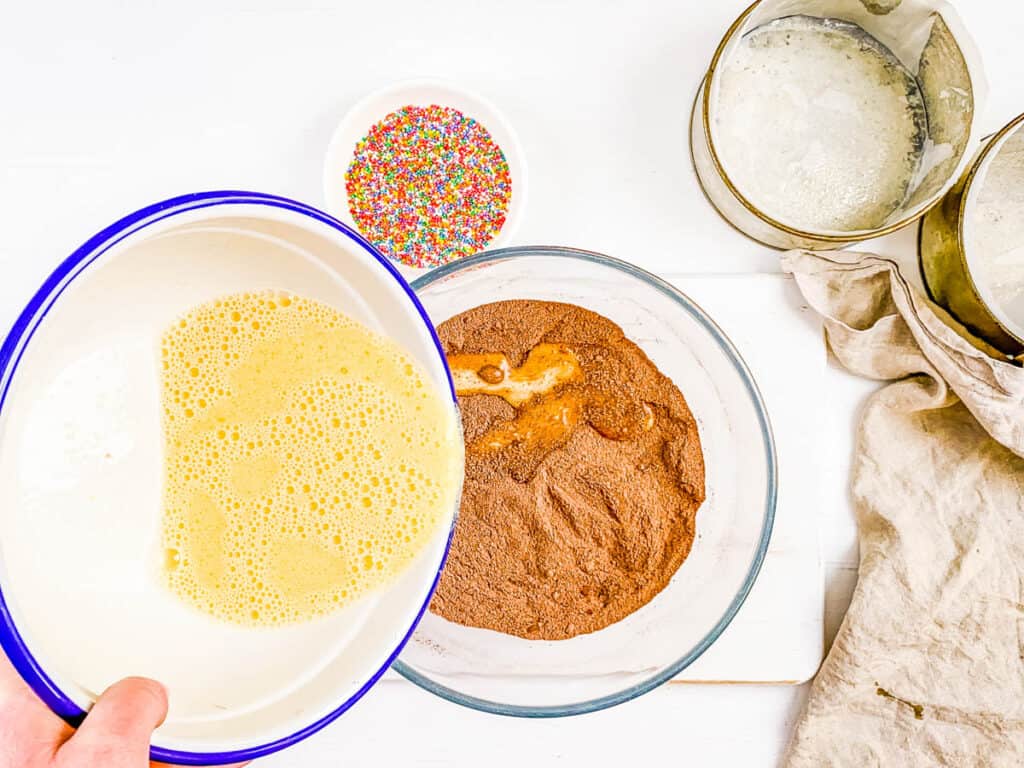
Add remaining wet ingredients and combine: I add the oil, vanilla, and eggs to the milk mixture and whisk. Next, I pour the wet ingredients into the dry mixture and stir until just combined.
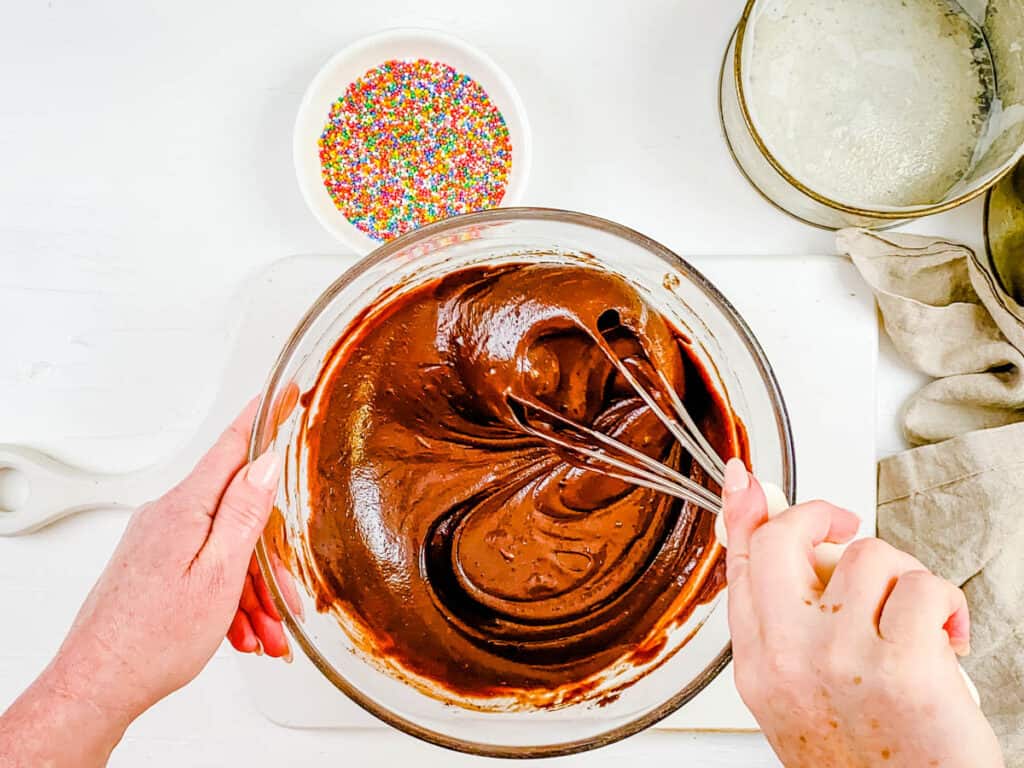
Make instant coffee: Then I dissolve my instant coffee into boiling water, and stir it into the batter until incorporated.
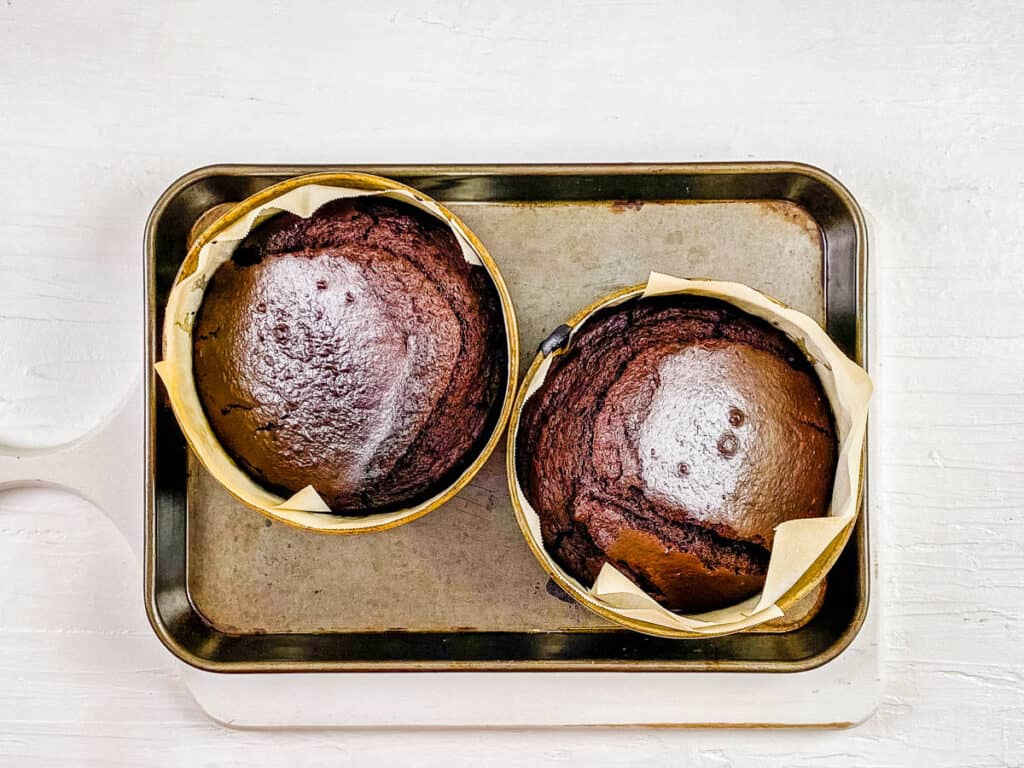
Divide batter and bake: I divide the batter between the pans and bake for 35 to 45 minutes, or until a skewer comes out clean.
Allow to cool: I let the cakes cool in pans for a minute, then transfer them to a wire cooling rack.
Prepare buttercream: While the cakes are cooling, I whip my pasteurized egg whites with powdered sugar for about 3 minutes.
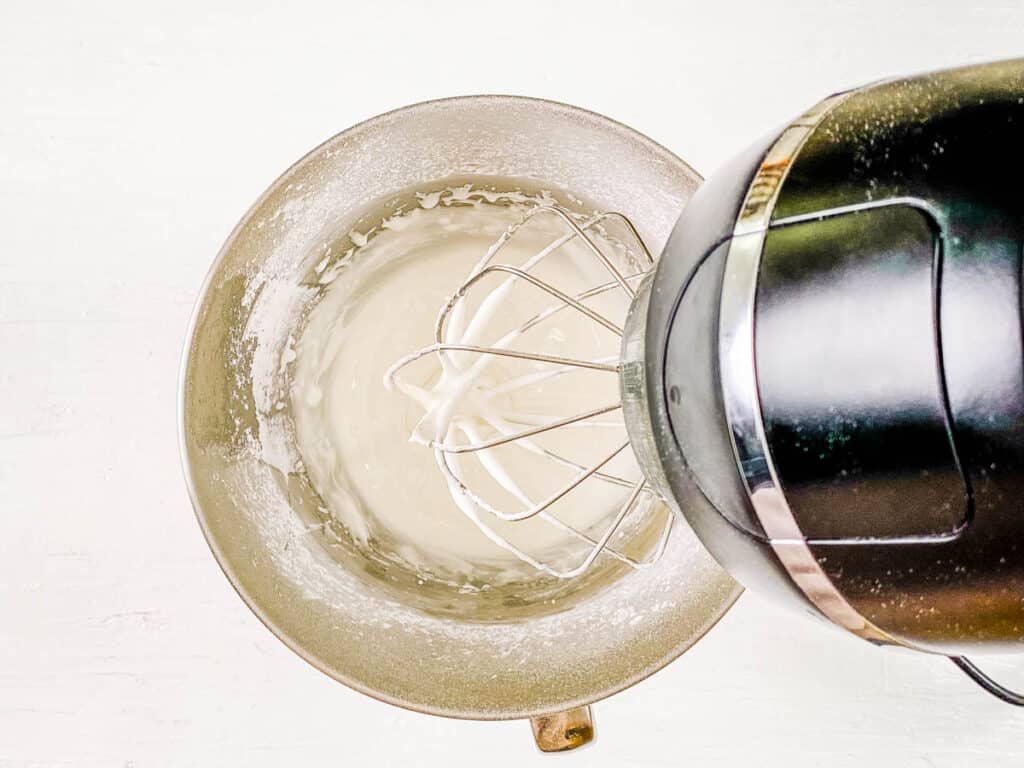
Add butter: Then I add the butter in 2 stages, and whip until smooth. I add my vanilla extract at the end.

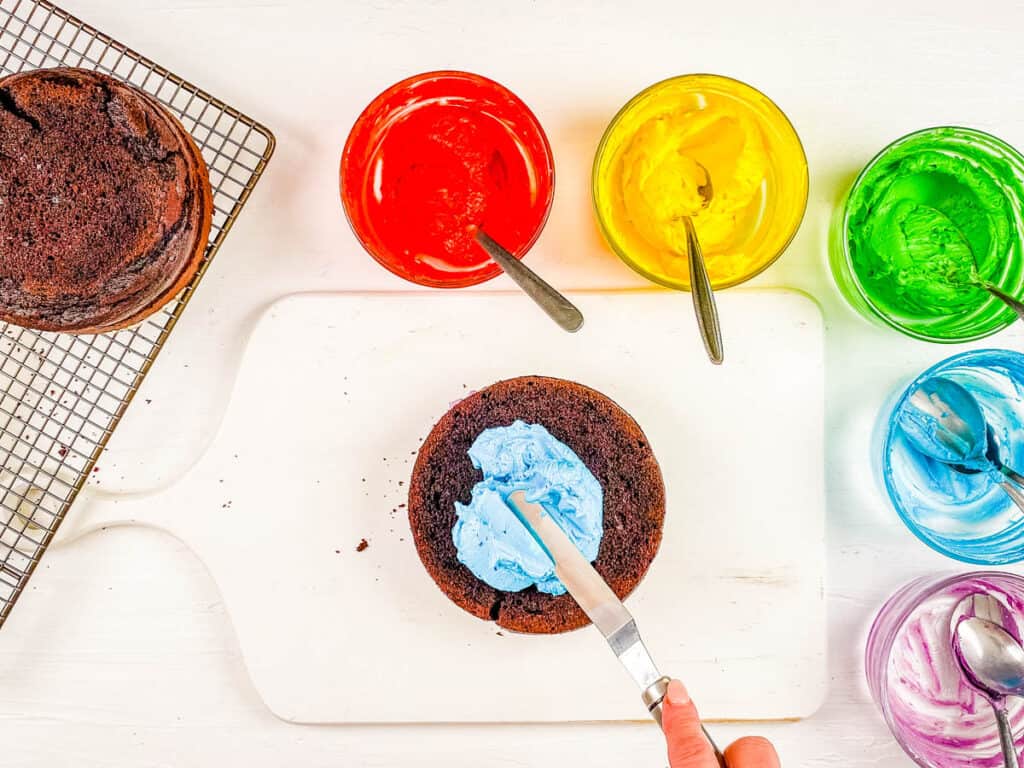
Slice cakes: I slice each cooled cake horizontally into three even layers.

Add food coloring: Next, I divide my buttercream into five bowls and mix in the food coloring.
Add buttercream to cake: I layer cake and buttercream on a cake board, stacking in the ROYGBIV rainbow order.
Prepare ganache, and ice the cake: I heat cream, and pour it over chopped dark chocolate and stir until smooth. I allow it to chill briefly before spreading it over the cake and decorating with sprinkles.
💭 Expert Tips
My #1 Secret Tip for this rainbow chocolate cake recipe is to chill my cake layers completely before adding frosting. Cold layers prevent any sliding, melting, or color bleeding. This way, my layers stay distinct and clean.
Other Tips To Keep In Mind:
- Keep ingredients at room temperature: When it comes to baking, I like to keep my ingredients at room temperature. This ensures smooth blending and easy rising.
- Do not overmix: Do not overwork your cake mixture. Overworked batter leads to a dense, stodgy cake.
- Use gel coloring and a toothpick: Gel colors give the best hues, but they are quite intense. I use a toothpick to add small drops at a time. And adjust as I go. This gives me better control.
- Wear plastic gloves: Since the gel colors are so intense, I protect my hands when working with the stuff. It can stain skin for days.
- Trim the domes: If my cakes have formed domes, I trim off the excess for a level appearance and stable structure.
📖 Variations
This recipe may seem extremely specific, but I was surprised by how much I was able to play around with it. These are a few of my favorite variations.
Chocolate orange boost: I add one teaspoon of orange zest to my batter. I love the way the citrus plays off the chocolate flavor. This is a favorite among my older friends and family.
White chocolate swap: If I really want to surprise people, I can cause a bit of confusion by covering the cake in a white chocolate ganache. I personally think this would be amazing as a fun wedding cake.
Ombre rainbow: I know it says rainbow, but I like to break the rules sometimes. I have made layers of one color, varying in intensity, for a gender reveal, and it was gorgeous.
🍽 Serving Suggestions
I prefer serving this rainbow chocolate cake at room temperature; this way, the layers are not cold to the touch, and the ganache is soft. This cake is extremely indulgent, so when I serve it I always make sure to have a tray of my gluten free brownies so that everyone gets a taste of the chocolate, no matter what their dietary preferences.
I always feel quite thirsty after having cake, especially chocolate cake. And I rarely have cake without a cold glass of milk to wash it down. This is something I’ve passed on to my kids. With this particular recipe, I like to pair it with my vegan horchata. This way, I can make sure that the flavors complement the dessert, it is dairy-free, and has some added health benefits thanks to the cinnamon. Next time you have chocolate cake, you must try this combo!
🧊 Storing And ♨️ Reheating
Refrigeration: I store leftover slices in an airtight container in the refrigerator for up to 5 days. I allow the slices to reach room temperature before serving.
Freezing: I wrap individual slices tightly and freeze them for up to 6 months. I then thaw slices in the fridge overnight before serving.
Reheating: I do not reheat this cake, as heat will cause the buttercream and ganache to melt or split.
❓Recipe FAQs
Why did my rainbow layers blend inside the cake?
Layers bend due to warm cake or soft frosting. Buttercream can be extremely temperamental. If my kitchen is hot, I like placing the bowls in the fridge to ensure it stays thick.
How do I slice my cake cleanly to show the rainbow layer?
I use a long, sharp knife when slicing, and wipe it clean between each cut. The cake is also easier to work with if the inside is still slightly chilled. That is why I let the ganache reach room temperature and move on quickly to slicing.
What do I do if my frosting or ganache separates?
If your buttercream has split its likely due to the varying temperatures of ingredients during the emulsification process. To fix this, I put the bowl in the fridge, wait for it to solidify and then rewhip it using a hand mixer. For ganache, I add a small amount of hot milk and dribble a bit at a time while whisking vigorously until it comes together. You could also place your ganache in a double boiler over low heat and whisk until it is smooth.

Love this dessert recipe? Please leave a 5-star rating 🌟 in the recipe below and/or a review in the comments section further down the page!
You can also FOLLOW ME on FACEBOOK, INSTAGRAM, and PINTEREST to see more delicious, healthy, family-friendly food, and if you have any questions, I’m here to help!
📋 Recipe Card
🎥 Watch How to Make It
Rainbow Chocolate Cake
Nothing beats a decadent rainbow chocolate cake to celebrate any special occasion with your loved ones. I make it with cocoa powder, rich dark chocolate ganache, and vibrant food coloring to create a stunning layered dessert. This colorful creation is loved by both kids and adults alike.
Servings: 16 slices
Calories: 554kcal
Ingredients
For The Cake
- ¾ cup Almond Milk
- 1 tbsp Lemon Juice
- ½ cup Brown Sugar
- 1 cup Coconut Sugar
- ½ tsp Salt
- 1 tsp Baking Powder
- 1 tsp Baking Soda
- ⅔ cup Cocoa Powder
- 1¾ cup All-Purpose Flour
- ½ cup Light Flavored Olive Oil
- 1½ tsp Vanilla Extract
- 2 Eggs Room Temperature
- ½ cup Boiling Water
- 1 tsp Dried Instant Coffee
For The Buttercream
- 2 Pasteurized Egg Whites
- 2 cups Powdered Sugar
- 1½ cup Butter Softened
- 1 tsp Vanilla Extract
- Rainbow Food Coloring
For The Ganache
- 12 oz Dark Chocolate
- ½ cup Heavy Cream
Topping
Equipment
Instructions
- Preheat oven to 350 degrees F / 180 C. Line 2×6 inch round tins with baking paper and set aside.
- Whisk together the almond milk and lemon juice, set aside.
- In a separate mixing bowl whisk the brown sugar, coconut sugar, salt, baking powder and soda, cocoa powder and flour unti well combined.
- Add the oil, vanilla extract and eggs to the almond milk mixture and whisk.
- Pour the wet ingredients into the dry ingredients, mix until combined.
- In a separate bowl mix the boiling water and instant coffee.
- Stir the coffee mixture into the cake batter and mix until incorporated.
- Pour the cake batter into the prepared tins and bake for 35-45 minutes or until an inserted skewer comes out clean.
- Allow to cool in the tins for 10 minutes before removing and cooling completely on a cooling rack.
- While the cakes are cooling prepare the buttercream: Whip the pasterized egg whites with the powdered sugar for 3 minutes. Add half the butter, whip until smooth. Add remaining butter and vanilla extract, whip for 4-5 minutes.
- Divide the buttercream into 5 small bowls and add food coloring, mix well.
- When the cakes are cold slice each cake horizontally into 3 even slices.
- Spread a layer of buttercream over the base slice of cake, top it with another layer of cake. Repeat until all cake and filling has been used.
- Prepare the chocolate ganache: Finely chop the dark chocolate and place in to a heat proof bowl.
- Place the cream into the microwave and heat until steaming.
- Pour hot cream over the chocolate and stir until smooth. Place in the fridge for 10 minutes to become a little firm but spreadable.
- Cover the entire cake with ganache and top with sprinkles.
Notes
- My #1 Secret Tip for this rainbow chocolate cake recipe is to chill my cake layers completely before adding frosting. Cold layers prevent any sliding, melting, or color bleeding. This way, my layers stay distinct and clean.
- Keep ingredients at room temperature: When it comes to baking, I like to keep my ingredients at room temperature. This ensures smooth blending and easy rising.
- Do not overmix: Do not overwork your cake mixture. Overworked batter leads to a dense, stodgy cake.
- Use gel coloring and a toothpick: Gel colors give the best hues, but they are quite intense. I use a toothpick to add small drops at a time. And adjust as I go. This gives me better control.
- Wear plastic gloves: Since the gel colors are so intense, I protect my hands when working with the stuff. It can stain skin for days.
- Trim the domes: If my cakes have formed domes, I trim off the excess for a level appearance and stable structure.
Nutrition
Serving: 1slice | Calories: 554kcal | Carbohydrates: 53g | Protein: 5g | Fat: 37g | Saturated Fat: 19g | Polyunsaturated Fat: 2g | Monounsaturated Fat: 13g | Trans Fat: 1g | Cholesterol: 75mg | Sodium: 337mg | Potassium: 286mg | Fiber: 4g | Sugar: 33g | Vitamin A: 679IU | Vitamin C: 0.4mg | Calcium: 67mg | Iron: 4mg


I made this cake for a birthday party and it turned out great. A real showstopper!
Woohoo! Thanks so much Kristen! 🙂
What an awesome, flavorful cake! My daughter loved it so much! Thank you for the great recipe!
Oh yay!! I’m so happy to hear that Ned! 🙂
This is such a fun and colorful cake! We loved each layer and all of the rainbow sprinkles! Going to make again for the next birthday party celebration! 🙂
Awesome!! So happy to hear that Kathryn!
This is the perfect cake for St Patricks Day! So fun and festive!
Yes!! It’s great for just about any celebration! You will love it!
I thought that the recipe was going to be a nightmare to make, but it was surprisingly easy! thanks for all the tips.
Yay! So glad to hear that Tavo!
What a colorful cake! Going to save this recipe for my daughter’s next birthday.
Thanks so much Jill! Enjoy!
I’ve been looking for a fun cake to make for my daughter’s birthday, and this rainbow cake is it! Thanks so much for sharing the recipe!
Yay! I can’t wait for you and her to try it! I’m sure you will all love it!